March, 2025
You might be asking, "What is left to do? Did we not complete the system in the prior step?" And the answer is that we did complete the System Generation, which builds a complete installation of MVS 3.8j. Then we did some additional steps to apply modifications and add what might be called 'tweaks' to make the resulting system more user friendly. And now, the system is ready to IPL (or load) for the first time.
After we bring the system up for the first time, we still need to complete a few tasks, because as the new system is now, all it has been set up to do is run batch jobs submitted through the card reader. So the tasks we will complete in this step are:
Add a DASD volume with several language compilers and software tools.
Create some new DASD volumes where you may store datasets you create.
Create some TSO User accounts on your system.
Start VTAM and TSO, so that you may log onto a TSO user session.
Add two very comprehensive dataset editors, both which are individually so much more than editors, since they provides many features to allow you to manage your use of a TSO session.
Add a program that allows you to view and manipulate JES2 jobs and their output.
Add a program that simply displays the current system date and time in several formats.
Enter, compile, link, and execute a simple COBOL program.
Along the way you will learn a little more about using MVS, TSO and other facilities of MVS.
To recap prior steps, you should already have downloaded/installed on your computer -
Hercules executables (main program plus utilities). As I am writing this set of instructions, I am using version 3.13 of the Hercules emulator (25 September 2017).
My installation objects archive (mvsInstallationResources.tar.gz for use on Linux /or/ mvsInstallationResources.zip for use on Windows). You do not need both of these files, only the one appropriate for your Operating System. Regardless of which you use, the archive must be dated March 10, 2025 or later.
You should have created the MVS starter system on two 3330 DASD volumes - START1.3330 and SPOOL0.3330 - located in the dasd directory.
You should have created the distribution libraries on 3350 DASD volume SMP000.3350 and have two work 3350 DASD volumes (WORK00.3350 and WORK01.3350) - also located in the dasd directory.
You should have created the new MVS 3.8j system on four 3350 DASD volumes: MVSRES.3350, MVS000.3350, SPOOL1.3350, and PAGE00.3350 - also located in the dasd directory.
Although not mandatory, this is the structure into which I have MVS related files and these instructions will show commands, output, etc. using this relative structure as a reference point:
My installation objects archive (item #3 in the prerequisites list above) contains files used for this and all subsequent steps of this set of instructions.
For Linux host Operating Systems, mvsInstallationResources.tar.gz. Eleven of the files are required for this step:
File Name
Extracted to Directory
Contains
condcode.rexx mvs REXX script to extract/display condition codes for jobs create.dasd.sh mvs bash script that utilizes the dasdinit utility to create empty DASD volumes submit.sh mvs bash shell script that passes jobstream file to socket reader using netcat mvs.cnf conf Hercules configuration file to execute Hercules/MVS 3.8j (the newly generated MVS system) mvs.script conf Hercules command script to add new DASD to configuration mvs00.jcl
mvs01.jcl
mvs02.jcl
mvs03.jcl
null.jcljcl Jobstreams (Job Control Language statements) submitted to MVS to add TSO User IDs, create User Catalogs, and install TSO application programs. mvs03.jcl was updated in March, 2025. tsoapps.het tape The datasets required to install four TSO applications: DATE, QUEUE, REVIEW, RPF. The tape contents were updated in March, 2025. Note: The files listed above are not the complete list of files contained in the archive. They are only the files that are utilized in this step.
For Windows host Operating Systems, mvsInstallationResources.zip. Twelve of the files are required for this step:
File Name
Extracted to Directory
Contains
condcode.rexx mvs REXX script to extract/display condition codes for jobs create.dasd.bat mvs Windows bat script that utilizes the dasdinit utility to create empty DASD volumes ncat.exe mvs Windows executable network utility used to write records across the network from the command line. submit.bat mvs Windows bat script that passes jobstream file to socket reader using netcat mvs.cnf conf Hercules configuration file to execute Hercules/MVS 3.8j (the newly generated MVS system) mvs.script conf Hercules command script to add new DASD to configuration mvs00.jcl
mvs01.jcl
mvs02.jcl
mvs03.jcl
null.jcljcl Jobstreams (Job Control Language statements) submitted to MVS to add TSO User IDs, create User Catalogs, and install TSO application programs. mvs03.jcl was updated in March, 2025. tsoapps.het tape The datasets required to install four TSO applications: DATE, QUEUE, REVIEW, RPF. The tape contents were updated in March, 2025. Note: The files listed above are not the complete list of files contained in the archive. They are only the files that are utilized in this step.
 The clock time required to complete the steps below should be
approximately 45 minutes. Most of the work in this step consists of tasks
that are interactive, so there are not as many batch processes running from
which to extract elapsed clock time. The time
necessary for you to complete the steps may be longer if you have not already
gathered all required files and have them restored to the appropriate locations
before beginning, but I will assume that at this point you have already
installed all the required files during the completion of the previous
steps. I am running Linux
Mint on a fairly recent, quad core machine; however, as much of this step
involves interactive work with the user, the speed of the processor only impacts
a few batch jobs. Granted I don't have to
contemplate the instructions as someone who had not read/followed them
previously might, so I am at a distinct advantage.
The clock time required to complete the steps below should be
approximately 45 minutes. Most of the work in this step consists of tasks
that are interactive, so there are not as many batch processes running from
which to extract elapsed clock time. The time
necessary for you to complete the steps may be longer if you have not already
gathered all required files and have them restored to the appropriate locations
before beginning, but I will assume that at this point you have already
installed all the required files during the completion of the previous
steps. I am running Linux
Mint on a fairly recent, quad core machine; however, as much of this step
involves interactive work with the user, the speed of the processor only impacts
a few batch jobs. Granted I don't have to
contemplate the instructions as someone who had not read/followed them
previously might, so I am at a distinct advantage.
MVS 3.8j only includes XF Assembler, so you need to add some compilers for languages like ALGOL, COBOL, FORTRAN, RPG, etc. There are also some batch utilities that will prove extremely useful while you are using MVS. Fortunately I built a single 3350 DASD volume in 2008 - the Volume Serial Number is SYSCPK - that contains many language compilers and other useful tools, so that all you need to do is download it. If you want to know the history and some detail about that 3350 DASD volume, you can read its page on my site @ ../compilers/syscpk.htm.
This 3350 DASD volume is already defined in the Hercules configuration file - mvs.cnf in the conf subdirectory. Please note: This volume is more than 'nice to have', since as of the previous revision of this guide, SYSC.PROCLIB and SYSC.LINKLIB, located on the SYSCPK volume, are integrated into the generated MVS 3.8j system, and it will not IPL without this volume present and ready to use.
So download the image from https://www.jaymoseley.com/hercules/downloads/archives/SYSCPK.tar.gz [24.2 mb MD5: d68f8ad016e503ce7de30ce4a2e4f538]. The archive contains a single file, the 3350 DASD volume image. Unpack it and place it in the same directory with your other DASD volume images.
Note: Even if you are rebuilding an MVS 3.8j system where you have SYSCPK installed, you should download the current version from the link above. I periodically make updates/additions to the volume and by downloading the current version, you will be sure to have all updates. As I am writing this, the latest version of SYSCPK was uploaded in February, 2025.
Although we created several DASD volumes as we went through the process of building the Distribution Libraries and completing the System Generation, there is still a need for several more volumes. In fact, you will probably wish to create even more volumes as you use your system. I have a more detailed page about the specifics of creating DASD volumes at: Adding DASD Volumes that you may want to read later. That page covers the entire process in detail from creating the volume image on the host operating system, initializing the image for use by MVS, and building VSAM User Catalogs. However, in order to move ahead here, if you will just follow through the simplified steps below, you will have enough DASD space to get a lot done.
We will use create.dasd.bat (the same script we have used before) to create two additional DASD volumes. The volumes we will create are:
The create.dasd script will:
create a dasd subdirectory if it does not already exist,
change to that subdirectory,
if the two DASD volumes to be created exist, delete them,
utilize the dasdinit utility (included with Hercules) to create the two volumes.
The only question asked when the script executes is: Do you want to create compressed DASD images? There have been many discussions on the pros and cons of compressed versus not compressed DASD images. Compressed images take less space on your host system (Linux, macOS, Windows, etc.), but when blocks of data are transferred to and from the compressed image, additional execution time will be incurred to perform the compression/decompression. It is completely up to each user whether compressed DASD will be used. Most current hardware is so fast that it makes little difference if compression is used. Also, most systems have very large hard drive storage, so the impact on space from having uncompressed DASD also makes little difference.
On a Linux system, open a terminal window in the mvs directory and type the command:
./create.dasd.sh user
and press Enter. The argument 'user' instructs the script to produce the eight DASD volumes required for this step. The script will execute, creating the eight DASD volumes. The output of the script on my (Linux) system is shown below:
If your host Operating System is macOS, I have been told that you need to use the command:
/bin/sh ./create.dasd.sh user
On a Windows system, open a command prompt window in the mvs directory and type the command:
create.dasd.bat user
and press Enter. The argument 'user' instructs the script to produce the two DASD volumes required for this step. The script will execute, creating the two DASD volumes. The output of the script on a Windows system is shown below:
The DASD volumes that are created are simply raw emulated volumes; they have not been initialized for use by MVS and contain no VTOC (Volume Table of Contents) or control structures. They will be initialized in one of the following steps.
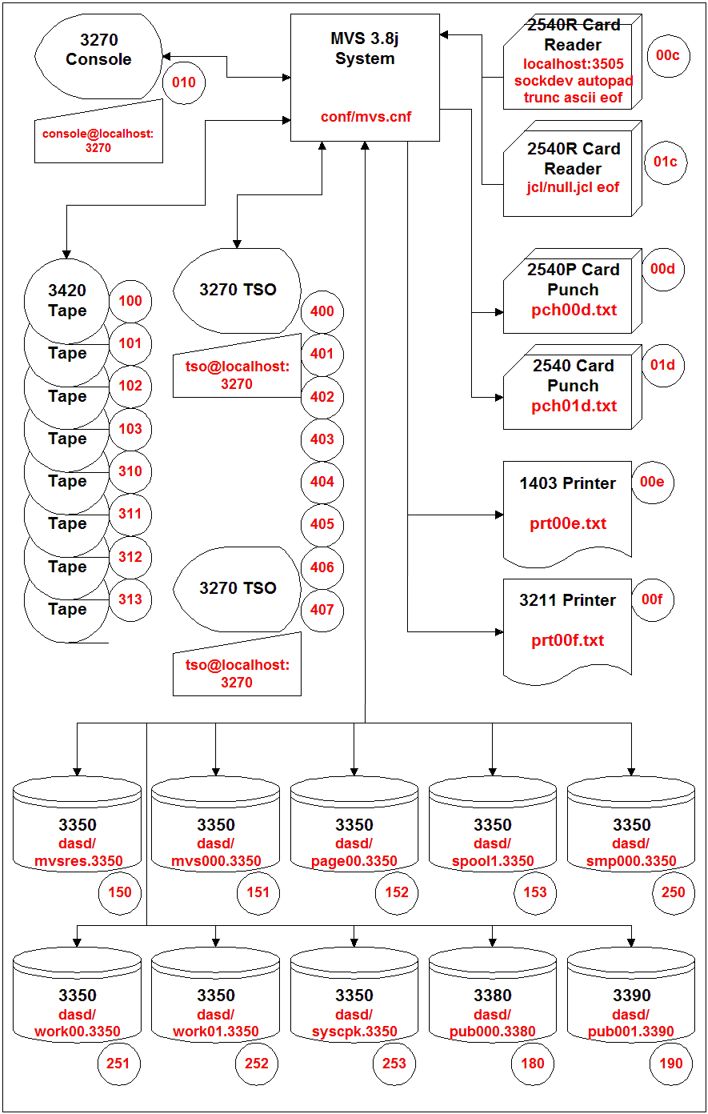
You are ready to IPL the newly generated MVS 3.8 system for the first time, and this time you will be using a very different configuration, because we are leaving the MVS Starter system behind and will be using your newly built MVS 3.8j system. The hardware environment defined in the Hercules' configuration file - mvs.cnf - is:
The two exceptions to this schematic exactly matching the Hercules configuration file mvs.cnf in the conf subdirectory are the two volumes we created above - PUB000 and PUB001 - which have yet to be initialized. In the Hercules configuration file, the two lines defining these DASD volumes are commented out.
All of the devices shown on the schematic match the devices specified in the Stage 1 deck of the System Generation. There are a great many more device addresses generated into the system for which this Hercules configuration file has not provided attached emulated devices. The reason you specify many more device addresses during the System Generation process is that it takes a System Generation to add new devices, and you should always minimize the need for doing System Generations, even the relatively simpler IOGEN, by adding all the device types, and device addresses, that you anticipate you may need for expansion.
If you want a reference for all the Hardware Types and Unit Names generated, it is available at mvs 3.8j generated hardware list.pdf This reference lists all devices by type and all devices by generic device name.
The configuration file also contains an entry for the alternate console (at device address x'009'), but it is commented out. In a real hardware environment you needed an alternate console defined to be prepared for a failure of the hardware attached for the master console. There is little chance of a 'hardware' failure that would require the use of the alternate console and activating it creates the requirement that a tn3270 client be attached and monitored to ensure that there are no pending messages that might 'hang' the system. So it is simply easier to leave the alternate console device commented out.
Do not comment out the hardcopy console in the configuration file (1403 printer at address x'015'). The MVS system will complain at IPL if this device is not available; besides, you need this in case you want to research a problem by looking at the information printed on the master console, which is captured for you in the host operating system file mvslog.txt.
There are five Unit Record output devices active in the generated MVS system:
Each time MVS is IPLed under Hercules, the files on the host OS which are associated with the Unit Record devices at these addresses will be overwritten. Even if no output is sent to the devices, the files will be reset to 'empty' by Hercules when MVS is IPLed. In January, 2025, Dave Trainor sent me a script and modified Hercules' configuration file that preserves these files' content by adding a date/time stamp to the host OS file name. Modification of the Hercules' configuration and start-up to implement this scheme is optional, but if you wish to apply this to your installation, I have provided complete instructions (for use on both Linux and Windows) at: TimeStampURdevices.htm. These modifications may be applied to your configuration at any time, so it is entirely appropriate for you to continue to the next section - IPL the MVS System - at this time, and you may decide later to apply these changes.
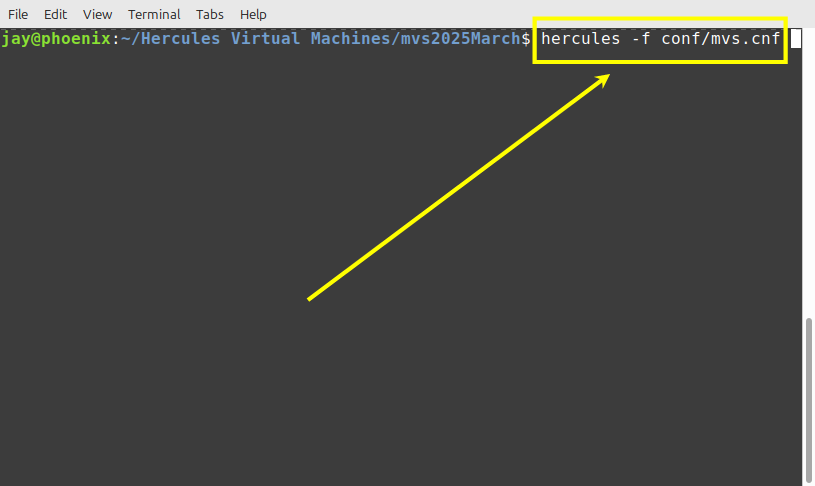
Open a terminal window (Linux) or a Command Prompt window (Windows) and start hercules from the mvs directory:
Hercules will load the configuration file and display:
You can see that eight of the ten DASD volumes shown on the schematic diagram of the mvs configuration are loaded. The two that are not present are PUB000 and PUB001. Those are the two new volumes we created above and have not yet been initialized.
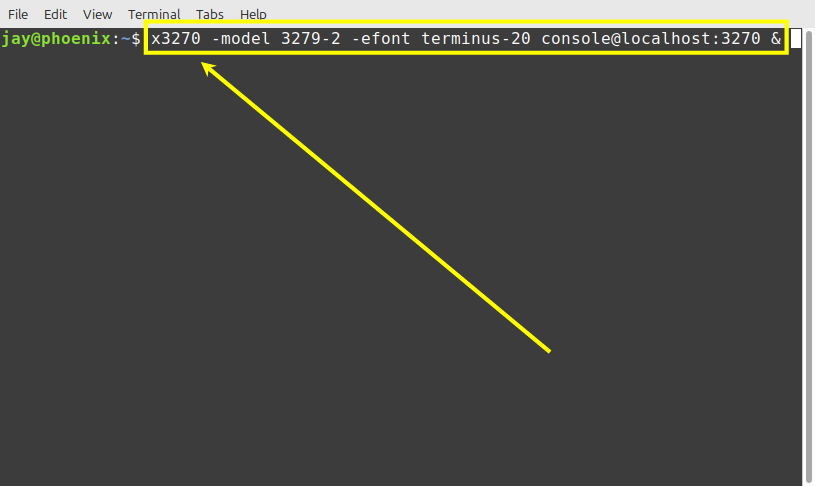
In another window, start a tn3270 client and connect to localhost at port 3270. Note: You must use a tn3270 client for the generated MVS 3.8j console and not a telnet client as we have been using for the starter system console. If you do not have a tn3270 client, I would suggest Tom Brennan's Vista tn3270 client (https://www.tombrennansoftware.com/) or x3270 (http://x3270.bgp.nu/). The 3270 refers to the port Hercules is listening on (defined in the Hercules configuration file: mvs.cnf, in the conf directory), not the fact that this is a 3270 device.
As a regular practice, you will probably not be using the MVS Console as much as you have during this process to build your MVS 3.8j system. But, you will still be using it occasionally. Until we make the changes to bring VTAM and TSO up, you will be using it during this step to submit jobs to MVS and to mount a required tape. If you can modify the font used by your tn3270 client to use a larger font - approximately 20 point works nicely - it will help you to see more clearly the information that is being presented on the MVS Console.
I do most of my work on TSO sessions, so for the x3270 client that I use for those, I have installed a fixed-point font named Terminus and use a 32 point version of the font. It makes using the terminal for longer periods of time more pleasant, with less eye strain. The Terminus font is available @ https://terminus-font.sourceforge.net/.
I have been told that Windows 10 will not resolve the localhost alias correctly, so you must instead use 127.0.0.1 as the connection address. Another individual reported the exact same errors on a Mac. I suggested that he try using 127.0.0.1 instead of localhost, which solved his connection problem.
In the configuration file, I specify console as the Group name (also known as the LUname) for the console 3277 devices and tso as the Group name for 3277 devices that will be used for TSO. If your tn3270 client doesn't allow you to specify the LUname, you may edit the configuration file to remove the Group names beside the 3277 device definitions. But be aware, without the Group names, the tn3270 client session(s) will attach to the 3270 devices defined in the configuration file in ascending address order - x'010', x'400', x'401', etc.
Below is the command I use to start x3270 on my Linux system:
Regardless of which tn3270 client you use, your tn3270 client screen (the MVS console) should display an identification screen indicating it has connected to Hercules:
Notice that the Device number field shows a value of 0010, which indicates that this tn3270 client session is correctly connected to address x'010', the 3277 designated as the master console. (The yellow arrow and text was added by me in editing and will not appear on your tn3270 client window.) Also note that at the bottom of the screen, the word console indicates it is attached to the 'console' LU (or Group) name.
IPL from the device at address x'150' (the 3350 DASD containing the MVS System Residence volume - dasd/mvsres.3350). In the Hercules console, type the command ipl 150 and press ENTER:
The MVS console will display message IEA101A, the same as the MVS Starter system has each time it was IPLed:
This console is a 3277 display device, so there are defined areas for output and input. The input field is located near the bottom of the screen, indicated with a green block cursor. Since this is the first time the newly generated system has been IPLed, the Link Pack Area that is kept in the paging files must be built. On the MVS console type r 0,clpa and press ENTER:
s
On subsequent IPLs, unless there is a specific reason you need to rebuild the LPA, you may just press ENTER at this prompt. I will discuss a normal start up and shut down of MVS 3.8j in a later section of this guide.
There will be some messages issued as the IEAPAK00 member from SYS1.PARMLIB is processed to rebuild the Link Pack Area:
This image is from an old capture on a Windows host system; the screen passes by so quickly on my current system that I could not capture it. These are informational messages, indicating that some modules specified in IEAPAK00 have not been loaded. The modules are not required for the operation of the system, so these messages may be disregarded.
Note: Any time you need to see messages that have been sent to the MVS console, you can find them in the text file mvslog.txt, located in the mvs directory. This file is created by the hardcopy console defined at address x'015' in the Hercules configuration file.
When all of the parameters specified by member IEASYS00 (in SYS1.PARMLIB) and the subordinate members pointed to from IEASYS00 are processed, you will receive two messages that require an operator response:
The first message (IFB010D), is requesting a reason code for the IPL, and may be responded to by typing r 0,u and pressing Enter:
This prompt allows for entries to be made in the Environmental Error Recording log in the case that hardware errors were the reason for the IPL. Although important when MVS 3.8j was running on real hardware, it makes little sense to capture this event in the EREP log. Further on I will guide you in removing this prompt from future IPLs.
You have seen the second message ($HASP426) each time the MVS Starter System was IPLed; this is a prompt from JES2 to allow you to specify start-up parameters. Since this is the first time this JES2 has been started on this MVS system, you should type r 1,format,noreq and press Enter to instruct JES2 to format the queues on the SPOOL1 volume and then start operation without waiting for requests:
JES2 will next issue an error message ($HASP479) requiring a response:
This message occurs because the Checkpoint dataset has never been formatted. You should type r 2,y and press Enter:
A second error message ($HASP436) will be displayed by JES2, requesting confirmation of the Checkpoint Record change:
You should type r 3,y and press Enter:
Messages are displayed as JES2 formats the spool, and then initializes using parameters it reads from SYS1.PARMLIB(JES2PM00). Console operator commands are read and processed from SYS1.PARMLIB(COMMND00).
The final User Modification we installed in the prior step sets the MVS Console into Roll Delete mode at IPL. This means that as the MVS Console screen fills up, the oldest messages scroll off the top of the screen and new messages may then be added at the bottom of the screen. Because of this mode of operation, you will see messages displayed and scrolled off the screen before you can fully examine them. Remember, you can always open the mvslog.txt file to see the messages that have been captured in the hardcopy console. Critical messages, and messages that require a response, will not be rolled off the screen automatically.
When the IPL process is complete the MVS Console will look like this:
During the IPL, two programs were executed as a result of commands contained in SYS1.PARMLIB(COMMND00): SETPFKEY and ZTIMER.
SETPFKEY sets the Program Function keys for the MVS Console to execute frequently utilized commands. The commands may be conversational, meaning the commands will be displayed and wait for you to supply additional parameters before executing, or non-conversational meaning they will execute as soon as you press the PF Key. You can add or change PF Key definitions by editing SYS1.PARMLIB(SETPFK00). You may display the current settings of the PF Keys by using the command D PFK:
The current settings of the MVS console Program Function keys will be displayed:
The Program Function keys may be set to execute frequently used commands. It is also possible to define commands into which you may enter additional information before the command is sent to MVS for processing. The commands which are indicated to be CONVersational in the display above allow information to be added at the position indicated by the underscore character. The settings for the Program Function keys may be changed by modifying the SETPFKEY member of SYS1.PARMLIB.
Just above the Program Function key display above, you may notice the ZTIMER program has ended. The ZTIMER program allows you to set commands to be issued at specific times. At each IPL, the ZTIMER program sets commands to be issued at just after midnight to clear the JES2 queue of printed/punched output that has been on the queue for more than five days. If you leave your MVS system running continuously, this can help prevent the JES2 queue from filling up. If the JES2 queue fills up completely, the system will halt and may not be restarted without an IPL with the JES2 command issued at startup to format the queue.
Even if there are no events that cause the ZTIMER program to execute, it will 'wake up' every two hours and execute. If there are no events scheduled, it will simply terminate.
You may add new commands to be issued by ZTIMER by editing the ZTIMER member of the SYS2.CONTROL dataset.
I have already mentioned the hardcopy console. It is an output only console generated in the system at address x'015', so all messages written to the console are written by Hercules to the host Operating System file mvslog.txt (in the mvs directory). You will always be able to view messages, even after they are rolled off the MVS console screen.
This is just the bare basics for using the MVS console. There is much more to know, and some of the information can make MVS much easier to use and manage. For a thorough understanding of MVS Operator Console operation, you might want to read the IBM manual: Operator's Library: OS/VS2 MVS System Commands. I provide a copy of the manual, in PDF format: ../downloads/pdfs/GC38-0229-1-OSVS2-MVS-System-Commands.pdf [10.8 MB MD5: e22135e89530cf3a6fd68a5ca03d6d0f]
At this time the IPL is complete and MVS is ready to process jobs and respond to operator commands.
There are quite a few MVS operator commands and JES2 commands that you will need to be familiar with to successfully utilize MVS. Volker Bandke has put together a list of MVS operator and JES2 commands at http://www.bsp-gmbh.com/hercules/oscmds.html. [July 2020] It was reported that Volker Bandke's hosting and/or domain registration has expired, so I have recovered this content and created a pdf containing it at ../downloads/pdf/Volker Bandke Command Summaries.pdf.
Tommy Sprinkle has a comprehensive reference of JES2 commands available at https://www.tommysprinkle.com/mvs/jes2cmds/index.htm.
Bob Hansen provides a summary of MVS operator commands at http://hansen-family.com/mvs/MVS Commands.htm.
I have also created a document containing a subset of JES2 commands that is available at ../downloads/pdf/JES2 Command Subset pdf. Note that I am calling this a Subset, because I have only included the JES2 commands that I think are most useful to the typical hobby user of MVS 3.8j and I have even omitted some operands that will only be needed for RJE, shared spool, etc.
It is difficult to find manuals for this old version of MVS, but several may be found at http://bitsavers.org. Links to some manuals at the site as I am writing this are:
- GC26-3792-8 OS/VS2 System Generation Reference Release 3.8 October 1980 (pdf)
- GC26-3841-3 OS/VS2 Access Methods Release 3.8 October 1980 (pdf)
- GC26-3902-1 OS/VS2 MVS Utilities Release 3.8 September 1983 (pdf)
- GC28-0645-4 OS/VS2 Release 3.8 TSO Terminal Users Guide June 1978 (pdf)
- GC28-0692-5 OS/VS2 MVS JCL Release 3.8 April 1984 (pdf)
- GC23-0007-1 Operators Library OS/VS2 MVS JES2 Commands January 1979 (pdf)
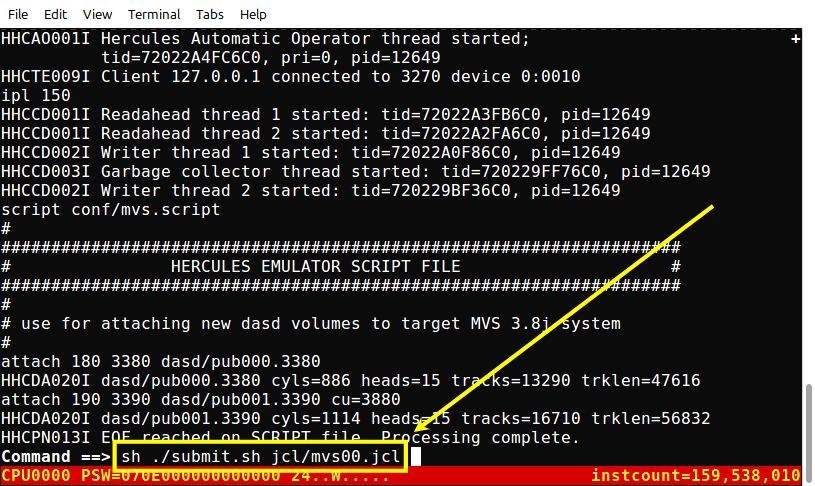
First the two new DASD volumes created above must be identified to Hercules. I have provided a script to do that. On the Hercules console, type script conf/mvs.script and press Enter:
The script will attach the two new DASD volumes - PUB000 and PUB001 - to Hercules:
As you can see in the image above, when the script executes, the two new DASD volumes are attached to the executing Hercules emulator. The two volumes will be placed online to MVS in a jobstream below, after they have been initialized and prepared for use by MVS.
If you intend to mainly work from TSO, and RPF or RFE (Review) which we will install below, the jobstreams you will be submitting to MVS by way of an emulated card reader will probably be minimal in size and infrequent. But for the next few steps we still need to submit jobs through the card reader, and you will probably always occasionally find a need to submit jobstreams to MVS contained in an ASCII file on the host operating system. So I will now describe the method which we will be using to submit job card images to MVS. While we were building the Distribution Libraries and performing the System Generation, we submitted jobs by using a Hercules command - devinit - at the Hercules command prompt to initialize the emulated card reader to read a file on the host operating system that contained JCL for a jobstream and pass the contents to an emulated card reader on the MVS system.
The first emulated card reader in the Hercules configuration we are now using for MVS 3.8j (mvs.cnf in the conf directory) is set up to use a socket reader that is monitoring port 3505 for input. There are several methods for sending the contents of a file - JCL statements - on the host operating system to the socket listening on port 3505; these are discussed in the Hercules reference manual - they include a PERL script, HercRdr (available from Fish at his site: http://www.softdevlabs.com/hercgui.html) or the netcat program. I have included a Windows version of netcat (ncat.exe) and a Windows batch script (submit.bat) in the mvsResources.zip archive. I believe that a version of netcat should also be included, and probably already installed, with most LINUX distributions. I will warn you that your anti-virus program on Windows may complain about netcat, because I have received warnings from several anti-virus programs over the years when I have used it and always must set up an exclusion in the current anti-virus program to be able to use it.
Update April 13, 2021: A recent discussion on the forums about difficulties in installing ASSIST on MVS under Hercules led me to replace the netcat utility I had been previously using (nc.exe) with the version of netcat from https://nmap.org/ncat/ (ncat.exe). This version of netcat provides the identical function of the version I previously included, but will not 'timeout' on very large card image files, as the nc.exe version did. It may also avoid the problems of antivirus programs complaining when they detect the presence of nc.exe, but that may still be a problem with some antivirus programs, so be aware of this. Linux users: If you wish to use my submit bash script (submit.sh), will need to install ncat on your system, which should be available in the repositories for your version of Linux, or may be compiled from the sources. I have been informed that macOS requires the nc program, and not ncat.
In February, 2025, Jamie Honnaker shared that on MacOS, you need to use brew commands to install x3270 and nmap:
- brew install x3270
- (installs x3270 client. The command to execute it is c3270. Does not accept the -efont argument)
- brew install nmap
- (your submit.sh script calls the ncat command, which is part of nmap)
Also, in order for submit (and other host operating system commands entered into the Hercules console command prompt) to execute under MacOS, the host shell command option must be included in your Hercules' configuration settions: shcmdopt enable.
In previous years I used SPF/PC to maintain many of my jobstreams and wrote some programs to allow me to more easily manage the jobstreams, as well as submit them directly from SPF/PC. At that time I created a separate page for those; it has not been updated for a while, as I have not used SPF/PC since moving my desktop machines to Linux, but the page is still available at at Submitting Jobstreams via Socket Reader. But for now we can just use the submit batch script to submit the remaining few jobs we need to finish customizing the system.
To submit a jobstream from a host operating system file to MVS, in a Command Prompt window type the command:
./submit.sh <directory>/<filename>
where <filename> is the name of the file, and <directory>, which is optional, specifies the directory where the file is located. The bash script file executes netcat with the following options:
cat $1 | ncat --send-only -w1 127.0.0.1 3505
to copy the contents of the file, specified as argument 1 to the bash script, to the listening socket at port 3505.
If your host Operating System is macOS, I have been told that you need to use the command:
/bin/sh ./submit.sh <directory>/<filename>
On a Windows system, open a command prompt window and type the command:
submit.bat <directory>\<filename>
The Windows script uses the type command, in conjuction with the ncat program, instead of cat, but otherwise functions the same.
I have received reports of people who run Windows 10 experiencing a loss of data (either lines dropped from the file being 'submitted' to MVS or premature termination of the file being 'submitted'). I don't have a resolution for that, but if you are running Windows 10 and experience aberrations, this is an area to examine.
One last comment on submitting jobs to the socket reader: You can submit jobs from the Hercules command prompt in the Hercules console, by using the command:
sh ./submit.sh <directory>/<filename>
This is my preferred method of submitting jobs from host file system ASCII text files.
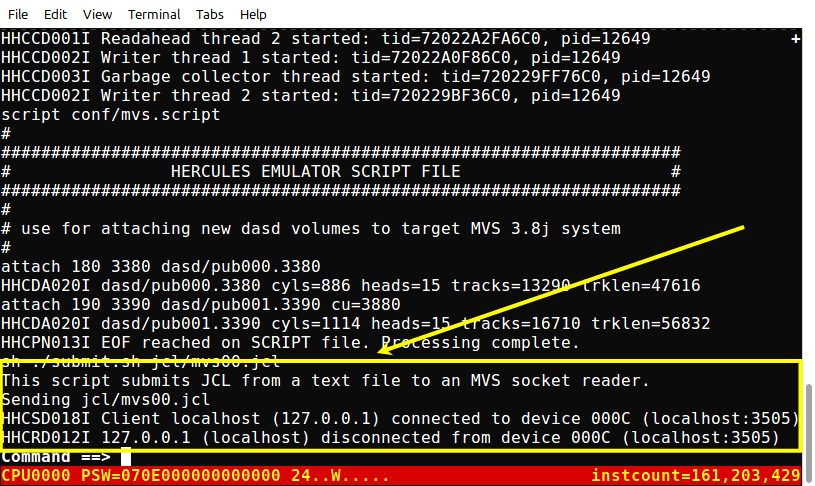
I have included a job - MVS00 (contained in file mvs00.jcl in the jcl directory) - which will initialize the two new DASD volumes and then submit a command to vary the volumes online.
At the Hercules command prompt in the Hercules console, type sh ./submit.sh jcl/mvs00.jcl [on Windows: sh submit jcl\mvs00.jcl] and press Enter:
Hercules will issue messages as it processes the submit sh script (or bat file on Windows):
The first two lines are simply informational messages echoed from the submit script. The last two lines are messages from the Hercules emulator confirming that a local client first connected to, then disconnected from, the socket reader at address x'000c'.
Messages will be displayed on the MVS console as the job is processed by JES2 and begins execution. The ICKDSF program will require confirmation before initializing the new DASD volume PUB000 on device address x'0180':
Type r 4,U and press Enter to proceed with initializing the volume at address x'0180':
You will receive the same message for the volume at address x'0190'. Type r 5,U to proceed:
When both of the new volumes are initialized, job MVS00 will submit another job - also named MVS00 - to the internal reader to be run in CLASS S. This job will Vary the volumes, which are now initialized, online and issue Mount commands to set the Volume Attribute for each volume appropriately.
The job MVS00 also imports the User Catalog on the DASD volume SYSCPK and defines three Aliases in the Master Catalog. The first of these Aliases allow datasets with a High Level Qualifier of SYSC to be located using the User Catalog on SYSCPK. The latter two Aliases are necessary to use the GCC compiler (for C language programs). When complete, the MVS console will display:
During the earlier processes when jobs were run that issued console commands it was necessary for you to approve each command, before MVS would execute it. But I set up the CLASS S initiator to execute commands without confirmation. The commands are logged to the hardcopy console, so there is a record if someone takes advantage of this authority. Class S is intended for use only for Systems Programming type jobs, so if this were a real world environment, someone taking advantage of this authority who was not supposed to would quite likely find themselves without a job.
This is a good time to tell you a bit about some of the parameters that have been set up in the system. This section of my website was created with the dual purposes of helping new Hercules/MVS users to rapidly set up a running system, as well as providing information about how the system is set up. To achieve the former, I have set many system parameters for you in the jobs that were executed during the System Generation phase. But those parameters can always be modified, so once you become more familiar with the system, you may change them to better suit how you wish to operate your MVS system.
Much of the operation of MVS is controlled by JES2 and the parameters that affect JES2 are contained in the member JES2PM00 in SYS1.PARMLIB. The three main functions are job entry (readers), job execution (job classes), and output (printers and punches).
There is one Hercules emulated card reader that is controlled by JES2 - the 2540R at address x'00c'. There are other card readers generated into the system and one of those is also defined in the Hercules configuration file - the 2540R at address x'01c'. There are reasons this additional reader is defined, but it is not intended for submitting jobs to JES2. That reader is defined specifically for reading card image files in EBCDIC format, which is useful for transferring binary files from the host computer into MVS.
There are two emulated printers controlled by JES2 - the 1403 at address x'00e' and the 3211 at address x'00f'. There is another 1403 printer defined at address x'015', which is a special case as it defined as, and dedicated to, the hardcopy log; it is not controlled by JES2. There are other printers generated into the system, but they are not defined in the configuration file; they are simply 'extra' printers.
There is one emulated card punch that is controlled by JES2 - the 2540P at address x'00d'. There are other card punches generated into the system and one of those is also defined in the Hercules configuration file - the 2540P at address x'01d'. Similar to the use of the card reader definied at address x'01c', the x'01d' card punch is used for transferring binary files from MVS to the host computer.
The JES2 controlled card reader is set up as a socket reader, which I have covered above. When a file of JCL is submitted to the reader, it is copied by JES into the job queue. The CLASS= parameter on the JOB card determines the class that the job is intended to be run in.
There are six initiators defined to JES2, three are not active when MVS is IPLed, but three of them are automatically started. The initiators select a job for execution when the CLASS= parameter on the JOB card matches one of the CLASSES the initiator is set to process. Currently the initiators are set to process these classes (listed in order by highest priority first):
Initiator 1 Initiator 2 Initiator 3 Initiator 4
(not started)Initiator 5
(not started)Initiator 6
(not started)A B
AS D
C
B
AE
C
B
AF
E
C
B
A
Class S is intended for use for System Programming tasks, so some of the control has been loosened on that class, which is why you don't have to 'approve' embedded console commands. It is not a good idea to simply use S for all of your jobs, however, as there are good reasons for those controls being in place.
The two printers controlled by JES2 are set to select non-held printer output in class A (the 1403 at x'00e') and class M (the 3211 at x'00f').
The card punch controlled by JES2 is set to select non-held punch output in class B.
Some of the parameters for JES2 may be changed from the MVS console and the changes will only remain in effect until the next IPL. Some of the parameters must be changed by altering the JES2PM00 member in SYS1.PARMLIB, then stopping and restarting JES2.
If you are interested in getting into the details of JES2 you should obtain JES2 Installation, Initialization, and Tuning manual (SC23-0046) from one of the Internet sources for IBM manuals.
Both of the new volumes, PUB000 and PUB001, plus the compiler/tools volume (SYSCPK.3350, which you downloaded from my site) have already been included in the VATLST00 member of SYS1.PARMLIB, so that next time you IPL the Volume Attribute will be correct and there will be no need to issue Vary or Mount commands.
You will need to edit the Hercules configuration file (mvs.cnf in the conf directory) and remove the hash (#) in front of the addresses for the two new volumes (180 and 190); they have already been included in the file, but could not be made active until the volumes were initialized. You must make these changes before you start Hercules again so that the volumes will be available to MVS.
The output from the job - MVS00 - will be be printed to the emulated Hercules device and the output will be available in the prt00e.txt file in the mvs directory. You may open the file to examine the output with a text editor or viewer, or you may still use condcode.rexx to check the condition codes.
However: You may have also noticed that one of the usermods we applied - the one that installed the IEFACTRT program - is printing step completion codes on the MVS console. The IEFACTRT messages are from this program and the information they are displaying is:
IEFACTRT SSSSSSSS/PPPPPPPP/CP:UT:IM.EX/WA:LL:TI.ME/CCCCC/JJJJJJJJ

  where SSSSSSSS is the step name [if step name is omitted: (JS#999), with the step number substituted for 999]
        PPPPPPPP is the name of the program executed
        CP:UT:IM.EX is the CPU time elapsed in HH:MM:SS.hh (hours, minutes, seconds, hundredths of seconds)
        WA:LL:TI.ME is the clock time elapsed in HH:MM:SS.hh (hours, minutes, seconds, hundredths of seconds)
        CCCCC is the completion code for the step (abends will be indicated with Ucccc for user and S-ccc for system abends
        JJJJJJJJ is the job name
MVS00 takes 0.49 minutes to run, although the execution time may be reported as longer if you leave the job awaiting for one of the responses from a message on the console. The expected completion codes are:
The completion codes shown above are from both jobs named MVS00 - the first two steps from the first job and the last two steps from the submitted job of the same name.
The VSAM Master Catalog resides on MVSRES and its name is SYS1.VSAM.MASTER.CATALOG. When a job attempts to catalog a dataset, if it is unable to find the mechanism to catalog into a User Catalog, it will default to the Master Catalog. You want to avoid that as much as possible ... always is the ideal goal.
We are going to create several User Catalogs and a fairly large VSAM Data Space, so we will have a place to create some VSAM clusters (user VSAM data) later on.
We just formatted a 3380 - PUB000 - and an even larger 3390 - PUB001. PUB000 will hold TSO User's datasets and PUB001 will be available for both Non-VSAM user datasets as well as sub-allocated VSAM clusters and data objects. We will define a User Catalog - UCPUB000 - that will reside on volume PUB000 and an Alias that will direct MVS to catalog all datasets with a high level qualifier PUB000 into that User Catalog.
We will also define a VSAM Data Space that utilizes half of the PUB001 volume and sub-allocate a User Catalog - UCPUB001 - from that space, and an Alias that will direct MVS to catalog all datasets with a high level qualifier PUB001 into that User Catalog.
We will also define a User Catalog on MVS000 - UCMVS000 - and an Alias that will direct MVS to catalog all datasets with a high level qualifier SYSO into that User Catalog. A number of years ago I set this type of organization up primarily to hold the five generations of SMF data that was collected, but it also provides a mechanism to handle other 'Operations' related datasets, hence the high level qualifier of SYSO (SYStem Operations). I don't know why, or when, I dropped back from using this organization, but when I was relocating the user mod that applies the IEFU29 exit, I remembered this and have now re-implemented it. It removes the need to supply the Master Catalog password whenever an SMF collection dataset switch occurs. My original explanation of setting up the User Catalog structure for SMF datasets is still present on this site at: IEFU29 Exit. It was pointed out to me, by a careful reader of my site, that I implemented this User Modification under the name IEFU29 when that page was originally created, but under this set of instructions I implement the User Modification under the name JLM0002. This is a correct observation. The original page for IEFU29 was written more than a decade ago, and when I consolidated many of my instructions into what is now this all-inclusive document on building an MVS 3.8j system from the IBM distribution tapes, I did rename the IEFU29 exit to align with the other exits that came about as a result of my own personal decisions. The contents of my website have been under development over a period that now exceeds two decades, and it is quite impossible to make certain pages synchronize with another page, or group of pages. IEFU29 is the name that IBM has given the exit, JLM0002 is the name I have chosen for the User Modification that implements the IEFU29 exit.
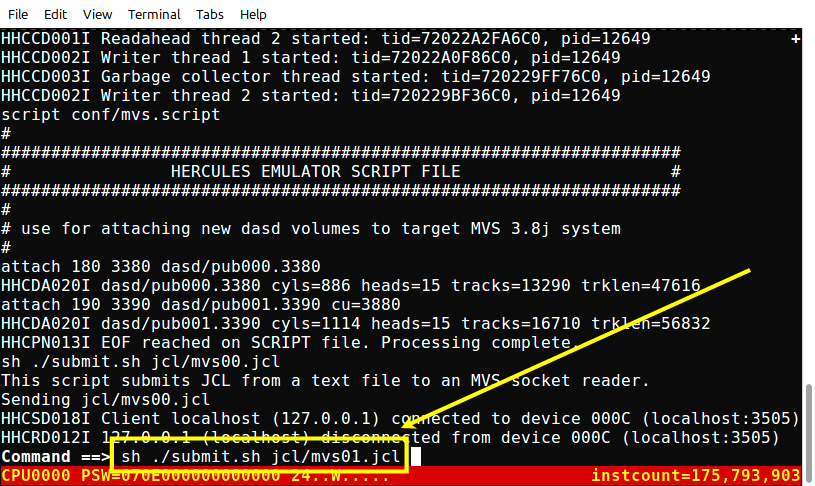
I have included a batch job - MVS01 (contained in file mvs01.jcl in the jcl directory) - that will complete setting up all the VSAM Data Spaces, User Catalogs, and Aliases for you.
The final step of this job sets the update password for the target system's VSAM Master Catalog (SYS1.VSAM.MASTER.CATALOG on MVSRES) to SYSPROG. This will prevent non-system datasets from being easily catalogued by mistake in the Master Catalog. This is a desirable safeguard, because the Master Catalog is defined with a finite and limited capacity so you should not be cataloging non-system datasets in the Master Catalog. To be clear, you will not be prevented from cataloging datasets into the Master Catalog, but after setting a password on the Master Catalog, any time there is an attempt to add, delete, or update an entry in the Master Catalog, a message is issued on the MVS system console asking for the operator to supply the password before the Master Catalog may be updated. Alternatively, in some cases, you may supply the password in the jobstream alongside the Master Catalog name.
In the next section we will be setting up Aliases so that all user datasets for each TSO User ID will automatically be catalogued in the correct User Catalog.
In a Command Prompt window in the Hercules console, type the command: sh ./submit.sh jcl/mvs01.jcl [on Windows: sh submit jcl\mvs01.jcl] and press Enter:
MVS01 does not require any input, and when completed the MVS console will show:
MVS01 executes for 0.01 minute and the expected return code is:
You will probably want to set up additional DASD volumes and User Catalogs. You may use the scripts and batch jobs we have used to create new volumes and User Catalogs here as examples to create as many volumes as you require. You may also want to read the page at addingDasdV8.htm.
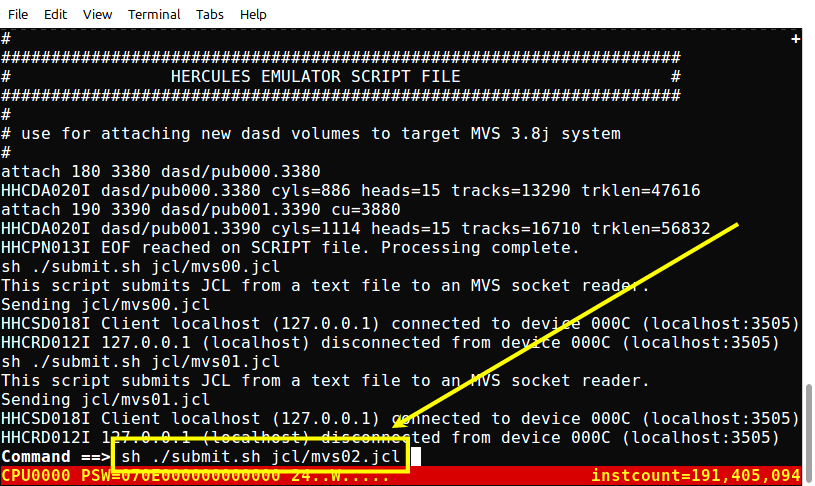
The last step before we may start TSO is to create some User IDs. The system comes with a default ID - IBMUSER - but it is very limited and is only intended to be used for emergencies. So I have included a batch job - MVS02 (contained in file mvs02.jcl in the jcl directory) - that may be used to create additional IDs for you. Like the jobstream that we used to create the User Catalogs and Aliases, this jobstream may be used as a model to create as many TSO User IDs as you wish to create. It is currently set to create two IDs - HMVS01 and HMVS02.
In a Command Prompt window in the Hercules console, type the command: sh ./submit.sh jcl/mvs02.jcl [on Windows: submit jcl\mvs02.jcl] and press Enter:
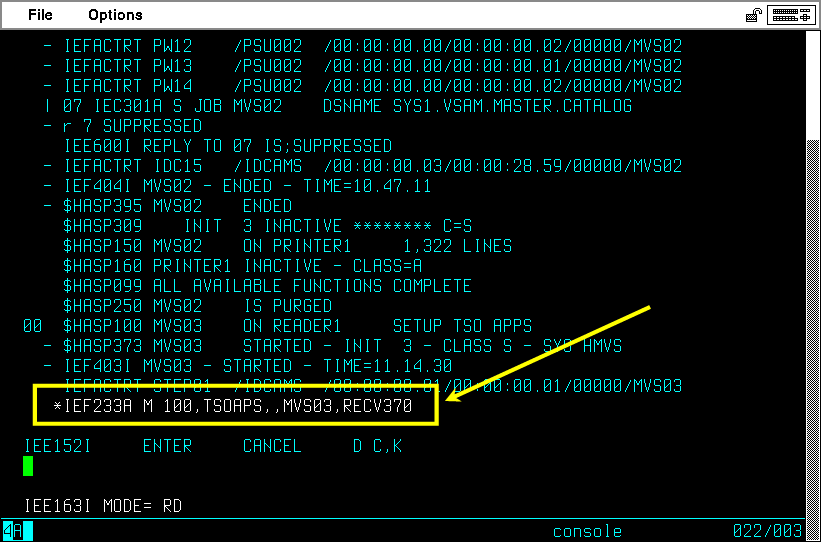
Because the last step of the previous job set an update password on the Master Catalog, you will be prompted to supply that password every time a modification of the Master Catalog is attempted:
In order to make the correct decision of whether to allow the creation of a catalog entry in the Master Catalog by a program, you must know what the program is attempting. In the two instances for job MVS02, Aliases are being created for the two TSO User IDs.
Type r 6,sysprog and press Enter to allow the creation of the Alias in the Master Catalog. Once you press Enter, what you typed will disappear from the screen, and, since this was a password request, what you typed will be suppressed not only from this MVS console screen, but from the hardcopy log as well. You need to reply to the second message with 7,sysprog and job MVS02 will end:
There are a lot of steps in the batch job MVS02 - 15 steps for each User ID added - although the job takes only 0.36 minute to execute. The expected return codes are:
For each User ID there are four datasets created:
TSO allows interactive programs to be run, with input from and output to the TSO User's screen. There are some very basic programs/commands installed with MVS, but to make the most out of your system, you will find that it is helpful to install other application programs. There are many available on the CBT Tape. I have provided a jobstream to install four applications, three of which are the most useful I think you can have. You will probably decide on a favorite editor - either RFE/REVIEW or RPF - and you will use that editor and QUEUE constantly. Before we submit the job to install them, here is a brief overview of the four applications:
RPF is very similar to ISPF and, since we do not have ISPF available, you must have something like RPF (or REVIEW, below) installed. The current version is V2R0M0 (Version 2, Release 0, Modification 0), and Rob has continued to add features so expect new releases periodically.
Rob distributes his releases as XMIT datasets, and I have written a guide to retrieving RPF in the new format from his website and installing it at Retrieving RPF V1R9M0 (and later) and Installing.
If you want to know more about the process that creates the files with the extension .XMI, I have written a brief explanation in Transmit/Receive.
We will be using RPF below to enter some COBOL source and some JCL. It may be useful for you to have a copy of the User's Guide for RPF 200.
I have already retrieved the V2R0M0 version of RPF and we will install it with the other three applications below.
Even though RPF has a utility panel to allow you to view output in the JES2 queue, the old standby QUEUE is nice to have and, since it is what I am familiar with, it is what I prefer. A very nicely updated version of QUEUE is available from Greg Price's website: https://www.prycroft6.com.au/vs2sw/index.html#queue.
I have already retrieved the jobstream for installing QUEUE from Greg's site and followed his directions to customize it for our configuration. We will install it with the other three applications below.
Even though RPF is great for editing files and provides many other useful tools, there are some tasks that are even easier using REVIEW, another product from Greg Price. It is on the same page as QUEUE at Greg's site, in fact, just below the section on QUEUE at https://www.prycroft6.com.au/vs2sw/index.html#review.
As with RPF and QUEUE, I have retrieved the latest, version 51.6, from Greg's site. We will install it with the other three applications below.
As I was adding TSO Command processors from the CBT tape to my system, I came across one to display the system date and time on the TSO User's terminal. Since it wasn't set up to handle dates with four digit years, I wanted to update that. Then I decided to do a complete rewrite using my own date routines so that I could have a more elaborate output. As of this update, I have also change the output method to use PUTLINE, so the output may be captured, and, at the same time, added some additional formats to the output.
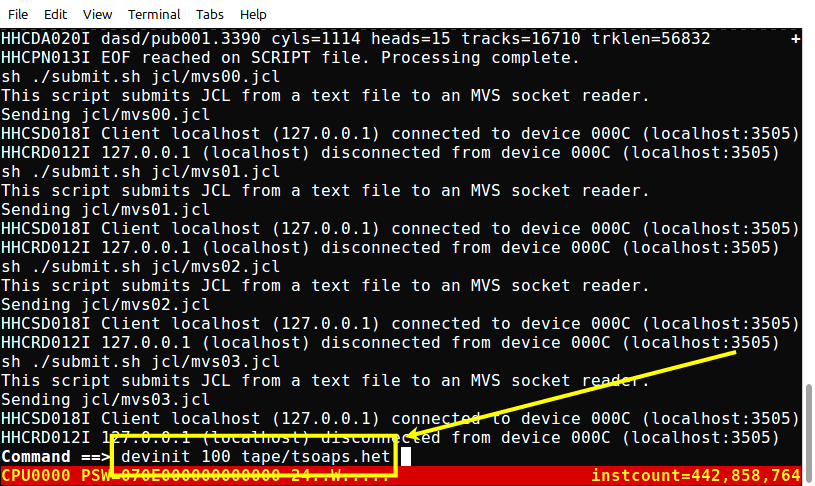
The jobstream to install the four TSO applications is in the host file MVS03.jcl. On the Hercules console, enter the command: sh ./submit jcl/mvs03.jcl [on Windows: sh submit jcl\mvs03.jcl] and press Enter:
The job requires a tape, so you will see on the MVS console:
On the Hercules console, enter the command: devinit 100 tape/tsoaps.het:
This is a multi-dataset tape and it will be retained until the end of the job, so that it is not necessary to re-mount the tape for each step that requires a dataset from the tape. The twelve datasets contained on the tape are:
Application
Dataset Name
Blocks
The MVS03 jobstream completes most of the installation of the four applications, but it will submit a job Greg Price has written to assemble and link QUEUE, named GREGQ. All steps of MVS03 and GREGQ should receive a completion code of 0000. When both MVS03 and GREGQ are completed the console will show:
At this point, your system is ready to start VTAM, which manages the terminal network, and TSO, which handles all the TSO functions.
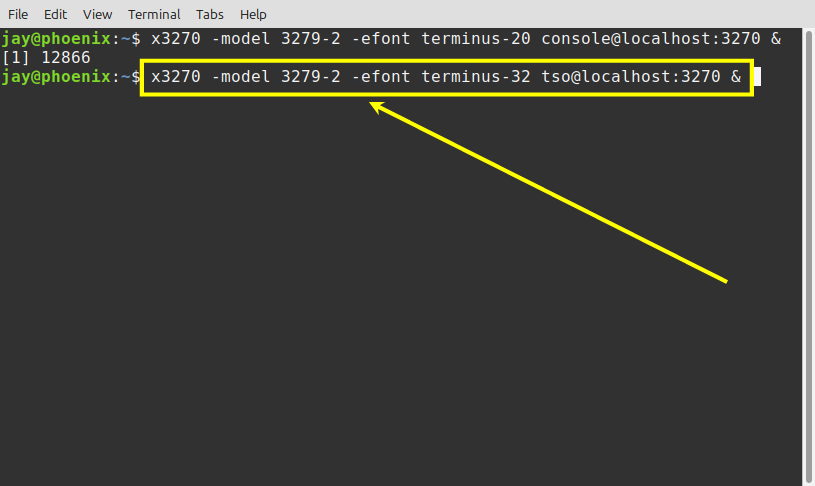
First you will need to start another tn3270 client session and connect to localhost at port 3270. Here is the command I use to start x3270 on my computer:
When connected to Hercules, the client window will display:
The Group name, or LU name, for this session should be tso. Your newly opened tn3270 client window should should show the Device number field as 0400, indicating that it is connected to the 3277 device defined at address x'0400'. Also, notice that the Group (or LU) name, at the bottom of the window, indicates this is a member of the tso group.
Note: You may start up to eight TSO sessions concurrently as the system is currently configured - to have more than eight sessions will require editing the VTAM and TSO parameters and is a fairly advanced topic.
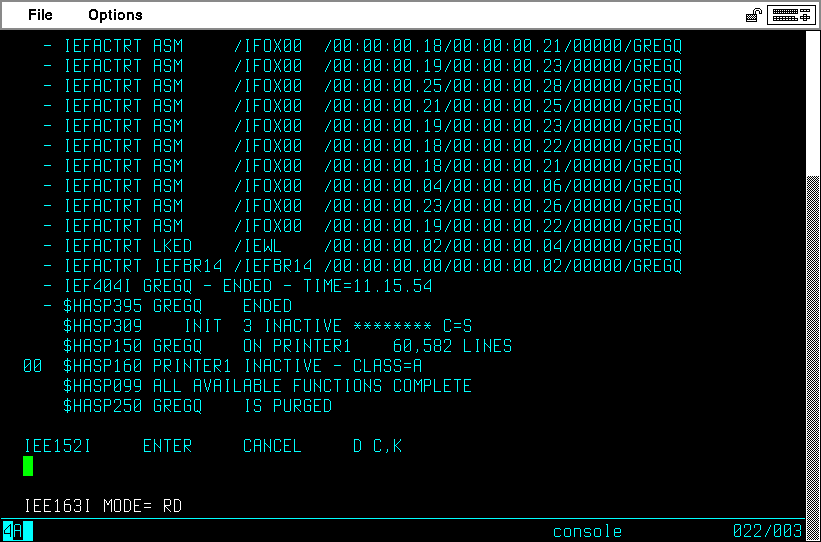
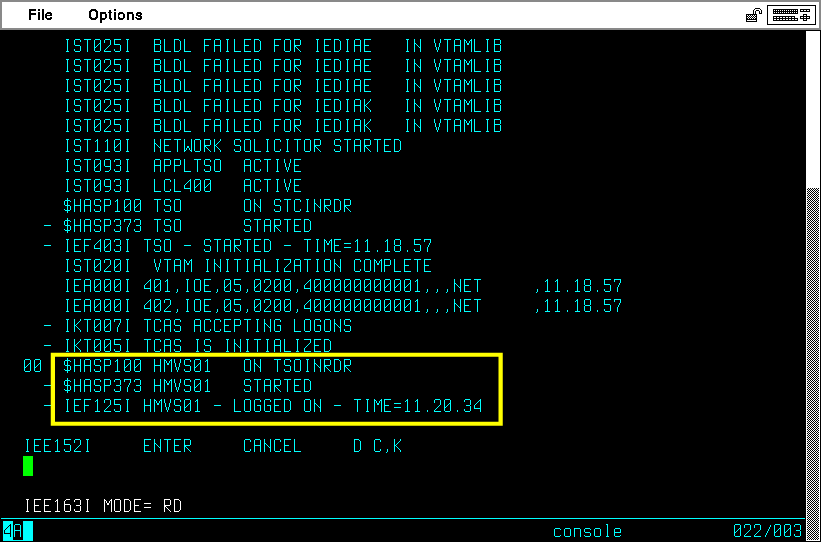
Because we did all the setup for VTAM and TSO near the end of the System Generation process, there is nothing special to do except issue a single start command. On the MVS console, type the command s net and press Enter:
NET is the cataloged procedure to execute VTAM. You may remember that we added a User Modification to automatically start TSO as soon as VTAM is initialized, so TSO will be started also, and you will see these messages on the MVS console:
The IST025I messages displayed are issued because TCAM is not set up on the system and may be safely disregarded. The IKT007I message indicates that TSO is ready to accept LOGONs. Your TSO screen (the newly started tn3270 client window) should now display the network solicitor screen:
Batch job MVS02 created two TSO User IDs, so at the Logon prompt, type logon hmvs01 and press Enter:
Several messages will appear briefly on the TSO session (tn3270 client window), however they may flash by too quickly to read. The screen will be cleared to display this welcome message and the TSO READY prompt:
The MVS console will also issue a message indicating the successful logon of user HMVS01:
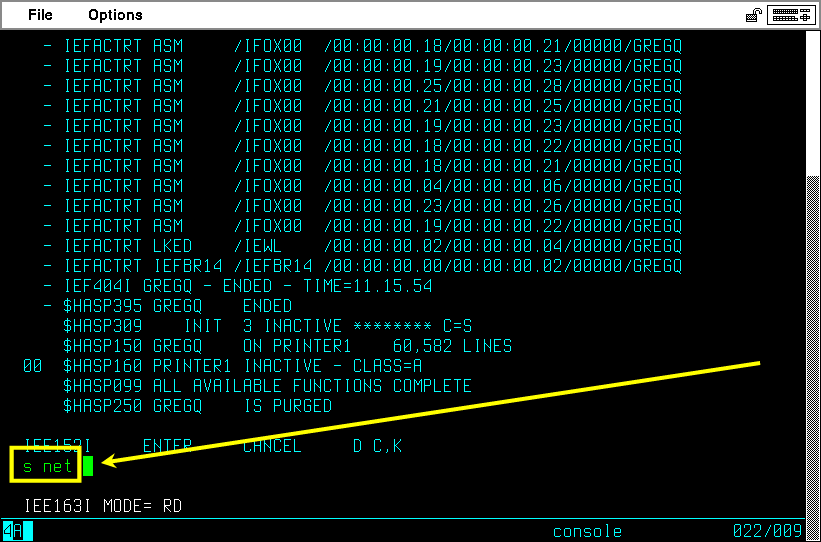
Start QUEUE on your TSO terminal, by simply typing q and pressing Enter:
With QUEUE installed, you can view held jobs and output in the JES2 queue. There is output from several jobs just from the short time we have had the system active. In the TSO window, type QUEUE (or Q) and press Enter to start the QUEUE program. At the QUEUE COMMAND prompt, type HO and press Enter to display the held jobs in the output queue:
All held output for jobs will be displayed:
To view the output for a specific job, place an S (or just move the cursor in front of the job, since S will be assumed), and press Enter. The first SYSOUT for the job will be displayed.
While viewing a held output dataset
There are many commands available for QUEUE, and help for them is available by pressing Program Function Key 1 from any QUEUE display.
None of the output for these held jobs is required, other than to satisfy your curiosity about the mechanics behind the jobs/started tasks that we have been executing, so when you are finished exploring them, place P in front of all the held jobs and press Enter to purge them from the JES2 queues:
To terminate QUEUE and return to the TSO command prompt, press PFKey 3.
A topic the comes up frequently on the Hercules MVS and Turnkey forums is the size of the SPOOL and experiences of the SPOOL filling up and/or JES2 running short of resources. Although I have set up an entire 3350 DASD for the SPOOL dataset, that is not very much space when you factor in the amount of information that is generated by a job: JCL and SYSIN input data, both read from the card reader, messages and logs, and SYSOUT output. It will be a temptation with QUEUE available to leave jobs sitting in the output queue indefinitely, but it is a good practice to regularly review and then print and/or delete jobs from the queue. SYSGEN05 set up a ZTIMER task that runs hourly and will purge all output from the spool that is five days old. This is largely just for an example of how to set up ZTIMER events and an MVS system that is getting heavy use would fill up the spool much sooner than five days. If you are using your MVS system to generate a lot of output, you should add more SPOOL DASD volumes to your system to handle the workload.
[17 September 2020] JES2 Queue Management
Even though RPF is great for editing files and provides many great tools, there are some tasks that are even easier using REVIEW, another product from Greg Price. It is on the same page as QUEUE at Greg's site, in fact, just below the section on QUEUE at https://www.prycroft6.com.au/vs2sw/index.html#review.
To learn more about using REVIEW and its companion program RFE (Review Front End), at the TSO READY prompt type HELP REVIEW or HELP RFE and press ENTER.
The DATE command displays the system date (in a text and Julian format) and the system time (in two formats):
The TSO system is sophisticated and provides a great tool. Back in the mid-1980's I like to think I was the primary catalyst in convincing IT management at the fairly significant municipal government where I was employed to allow each application programmer to have their own terminal on their desk and to have access to TSO/ISPF to enhance their productivity.
If you are unfamiliar with TSO, I urge you to spend some time with my TSO tutorial. One of the first items you should read is the section about PROFILE PREFIX.
You may observe that if you leave your TSO session inactive for a period of time, you will be logged off automatically. The topic: How can I increase the time interval before TSO automatically logs off my session because of inactivity? describes this in detail and suggests methods to change this.
That is pretty much up to you, since you now have your own private mainframe. I find that although I don't make a lot of changes to the MVS datasets, I do occasionally make a small change. You shouldn't feel intimidated if you think you can make your MVS system work better by researching how some settings or load modules can be changed to improve how it works for you. I do tend to isolate my own datasets from the MVS datasets and most of what I change occurs in those spaces. I have a lot more DASD created and populated on my system than we have set up here. That is where I keep third party programs I have installed, along with source code for my own programs, my own private load libraries, and my JCL libraries. Oh, and lots of documentation datasets keeping track of what I have done. I have a philosophy of 'change management' that comes from incorporating ideas of many other people I have worked with over my career. I wrote some of those ideas down several years ago and put it in a document at Customizing MVS. I used that title for the page long before I wrote this one, so it is not just a rehash of what I have said here.
Also, I don't know quite where to mention this, but I will drop it here and probably figure out another place to say it so that it won't get lost as someone works their way through this. In Stage 1 I set a CTLPRG option to allow for multiple CPUs to be managed by MVS, as that is something that some people in the Hercules/MVS community were interested in. I have not yet ventured there. But if you want to explore that, you will need to change the Hercules configuration file settings to enable multiple CPU emulation. Go back to www.hercules-390.eu and research the options necessary, then make the changes to your Hercules configuration file - mvs.cnf in the conf directory - and see what works for you on your host Operating System.
So, as a last step before going through the normal shut-down routine, we can go through the procedure to enter, compile, and execute a COBOL program from TSO.
At the TSO READY prompt, type RPF and press Enter:
The main screen of RPF will be displayed:
Datasets have already been created for you when your TSO User ID was created, so we are going to create two new members in two separate datasets. Type 2 and press Enter to display the edit menu:
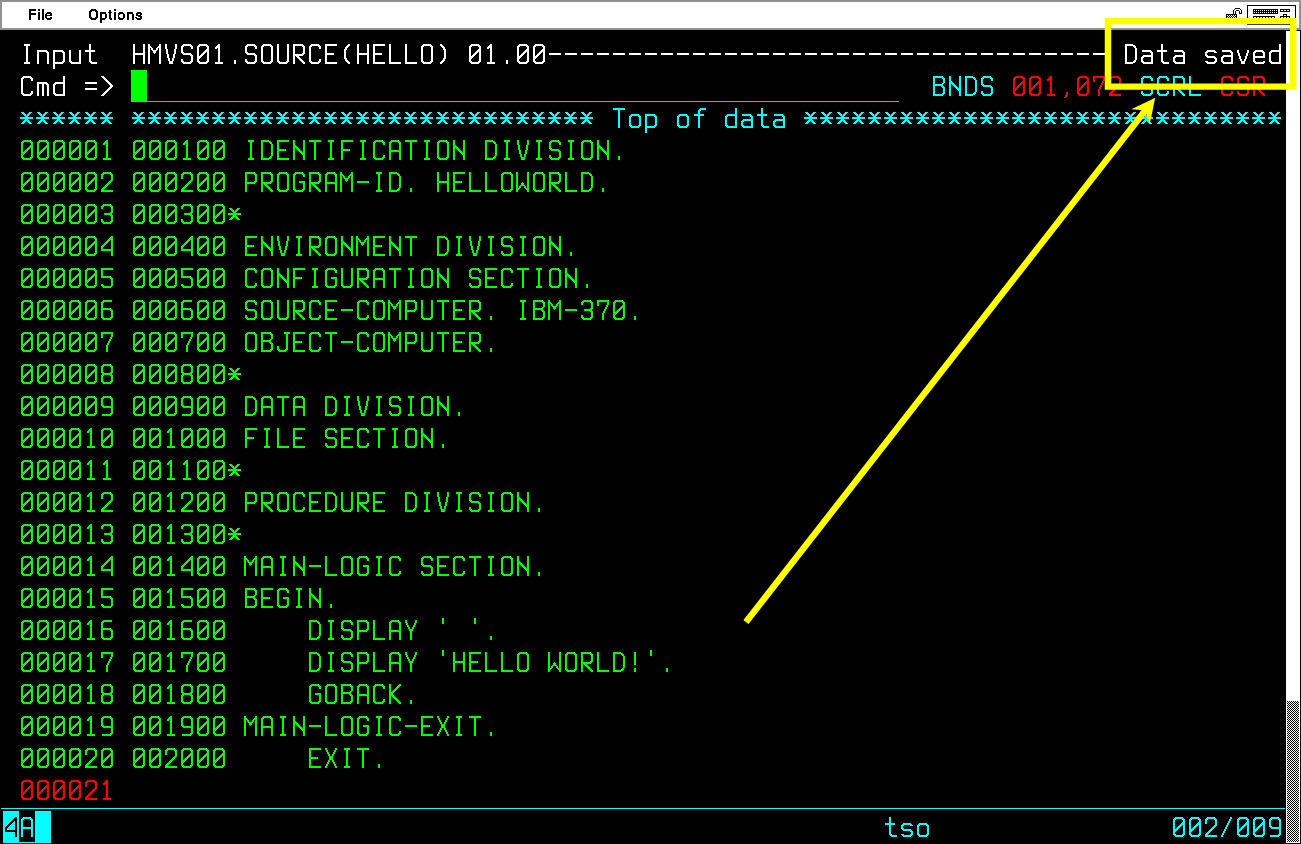
On the RPF EDIT screen, tab down and type SOURCE as the data set name:
On the RPF main screen, your prefix was shown to be user TSO User ID - HMVS01. Your prefix is prepended to what you enter at data set name, so the dataset you will be editing is HMVS01.SOURCE. This dataset was created when the TSO ID was created. Since it is a catalogued dataset, you may leave the Volume serial field blank. Press Enter.
As this is a brand new library dataset, there are no members. In the Cmd field, type s hello and press Enter:
The 's' is an abbreviation for 'select', and since the member does not exist, it will be created for you, ready to have data typed into it. Type the following short COBOL program:
On the cmd line at the top of the screen, type save and press Enter:
The member will be saved to the dataset, then the screen will be updated with a 'Data saved' message:
Press Program Function Key 3 twice to return to the main EDIT panel.
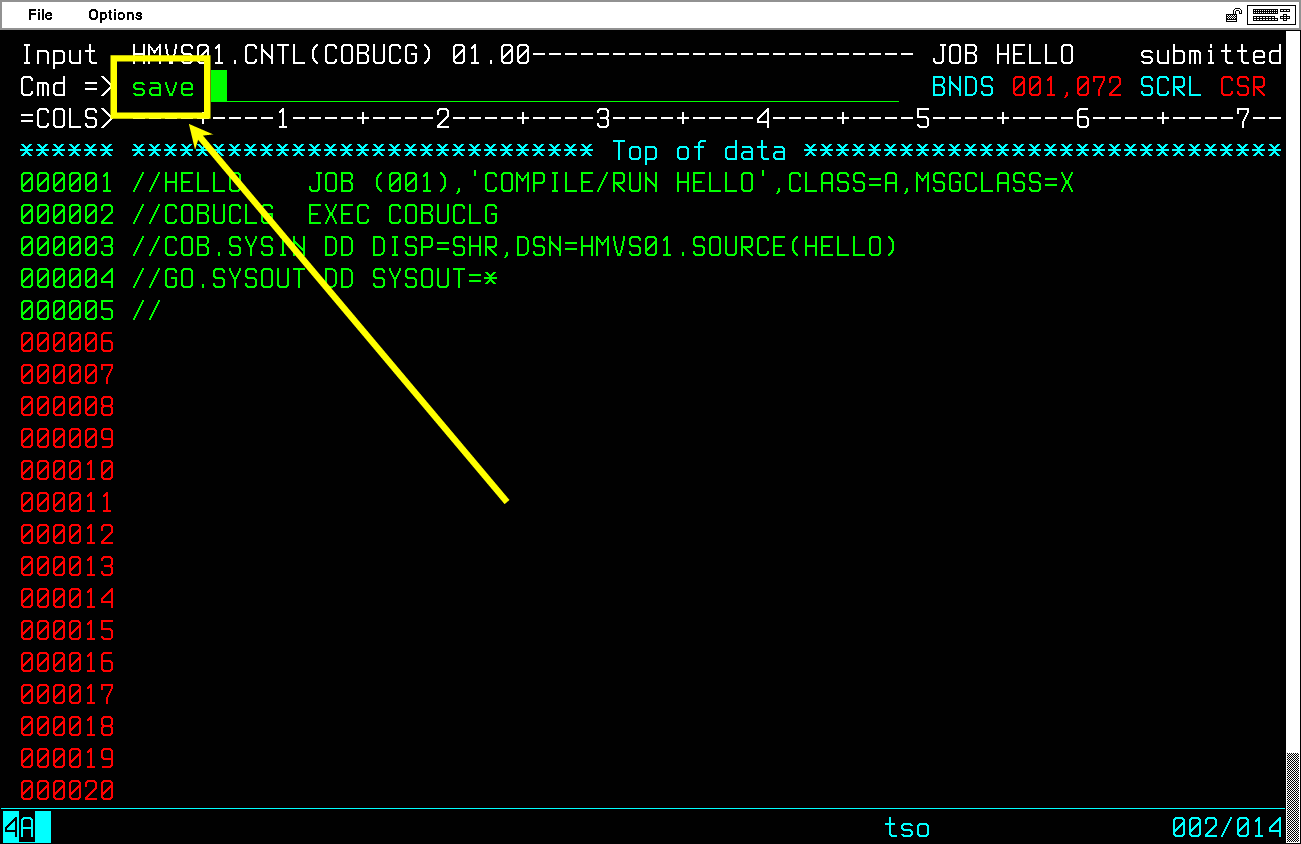
Here is a different way to enter the dataset/member name to be edited - we will use this method for the JCL we must create to submit the job to MVS. On the RPF Edit panel, type cobucg in the Member name field and cntl in the Data set name field:
Your prefix is prepended to what you enter at data set name, so the dataset and member you will be editing is HMVS01.CNTL(COBUCG). The dataset HMVS01.CNTL was also created when the TSO ID was created. Since it is a catalogued dataset, you may leave the Volume serial field blank. When you press Enter, you will be presented a panel with the editing area set to edit the member you specified. As this is a new member, the lines for the data will all be blank.
Job Control Language statements are a bit tricky to enter correctly, so in the Cmd field type COLS and press enter. This will add a ruler at the top of the screen to show you the columns you are typing into below the ruler:
Now enter the JCL for the job to compile and run the HELLO COBOL program:
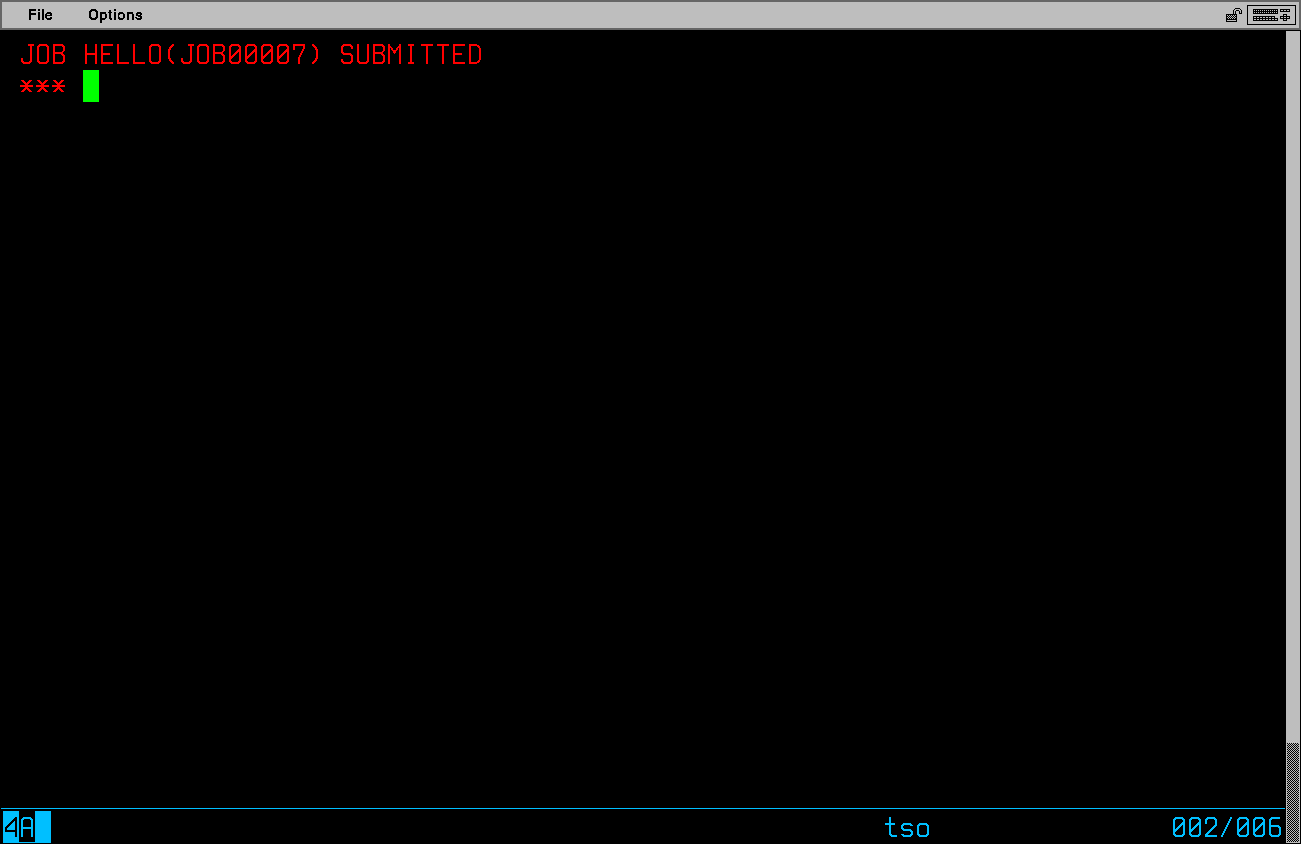
When all the JCL is entered, in the Cmd field, type SUBMIT and press Enter:
When TSO submits the job to the Internal Reader, you will receive a message:
While MVS runs the job, you can save your jobstream and exit RPF. Type the command save and press Enter:
The JCL you typed will be saved in your HMVS01.CNTL dataset, COBUCG member.
Press the Program Function Key 3 four times to exit RPF back to the TSO READY prompt.
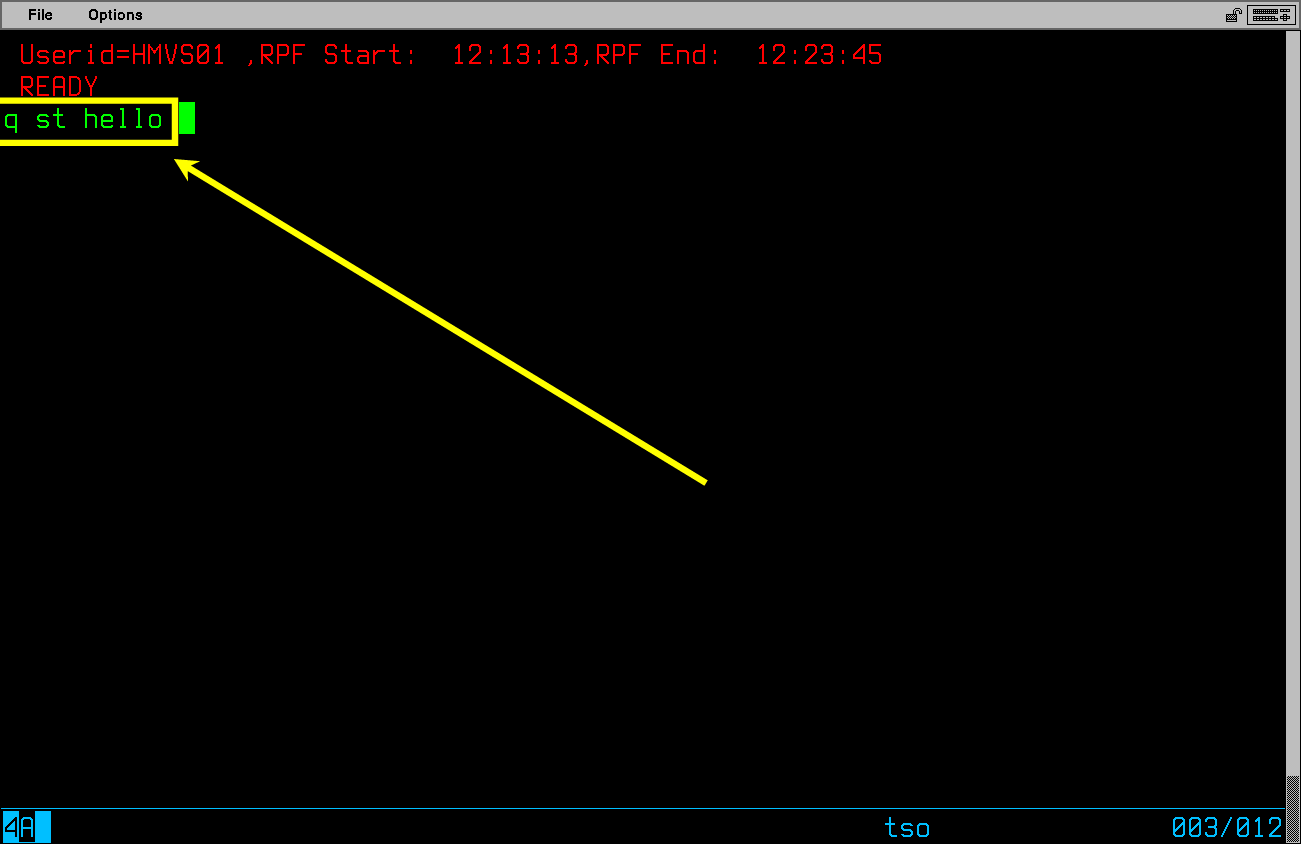
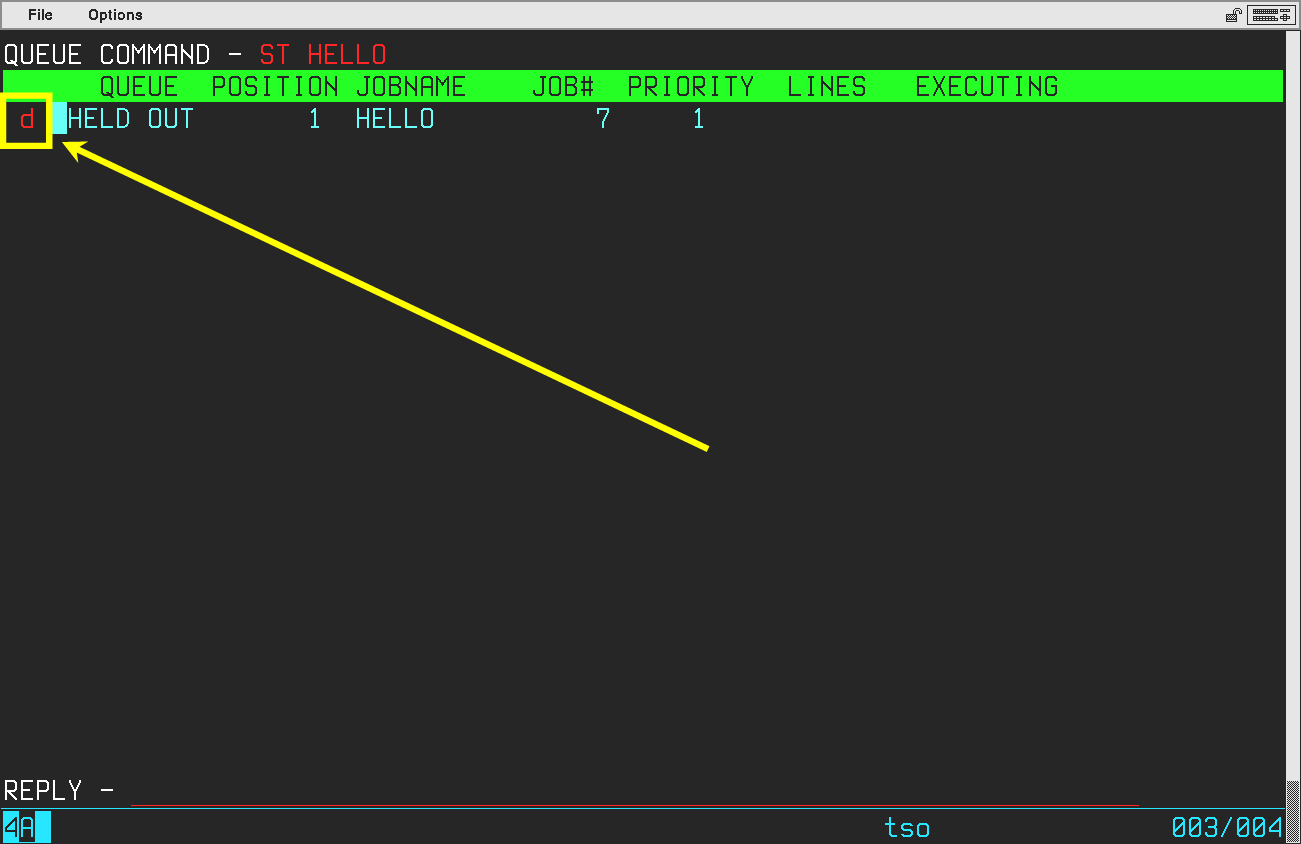
At the TSO READY prompt, type q st hello and press Enter:
Then type d in front of the line for the job 'HELLO' and press Enter:
The panel you will be presented for the d selection code shows just the output that is expected from the DD names in your JCL that are to be sent to SYSOUT=* (where * in this case equates to the same as the MSGCLASS= on the JOB statement, which is Class X).
If there is no number of lines beneath the LINES column header and no class designation letter beneath the CLASS column header, there was a problem in executing your job; i.e. you cannot display output if the job step did not execute. If this is the case, return to the previous panel (PFKey 3) and type s in front of the line for the job named HELLO (rather than d, which requests only the output for DD names assigned to SYSOUT to be displayed). This will select all output produced for the job. Examine the JES2 JOB LOG, JCL listing, and messages (you can use n (next) and p (previous) to page through the different output groups. From the information there you will have to diagnose what problem occurred, resolve it, correct your JCL, and resubmit your job.
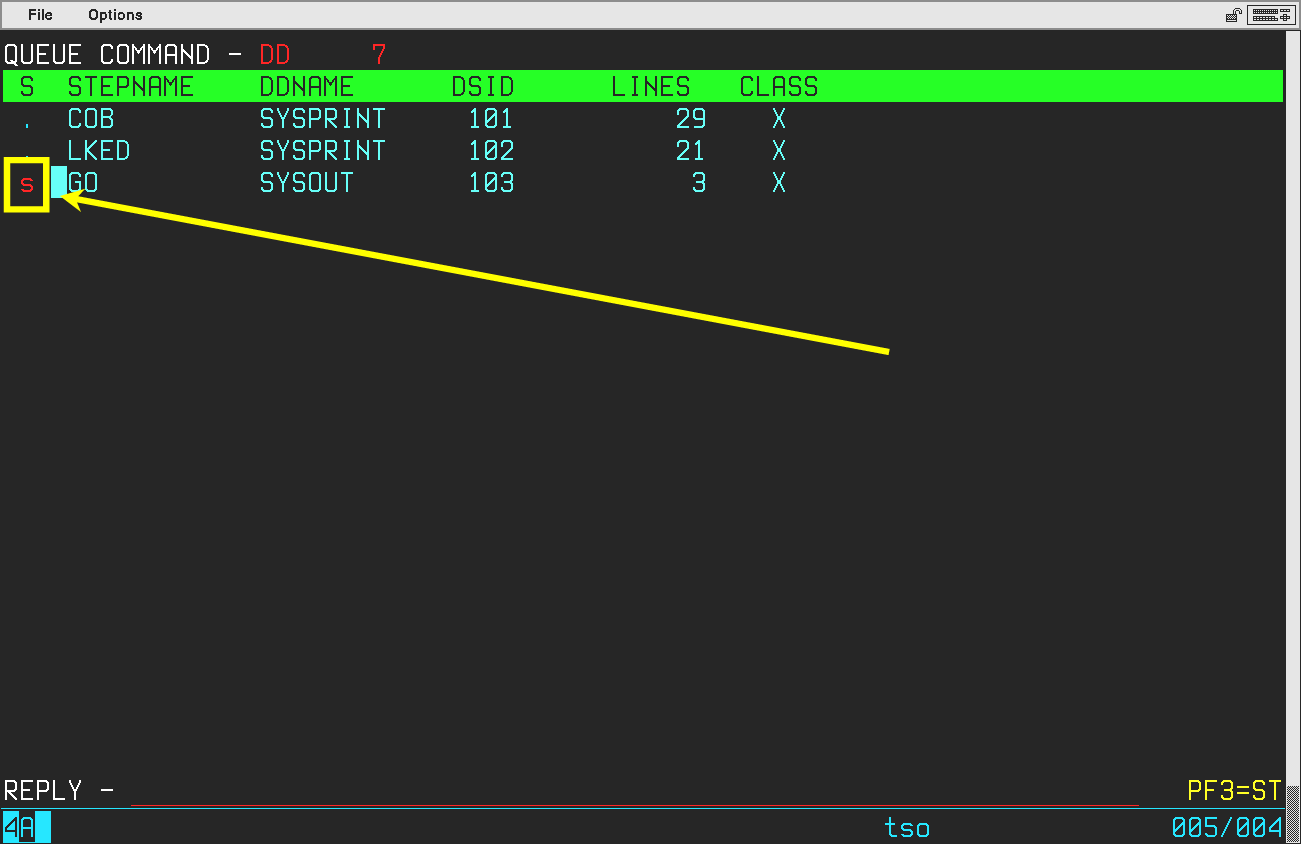
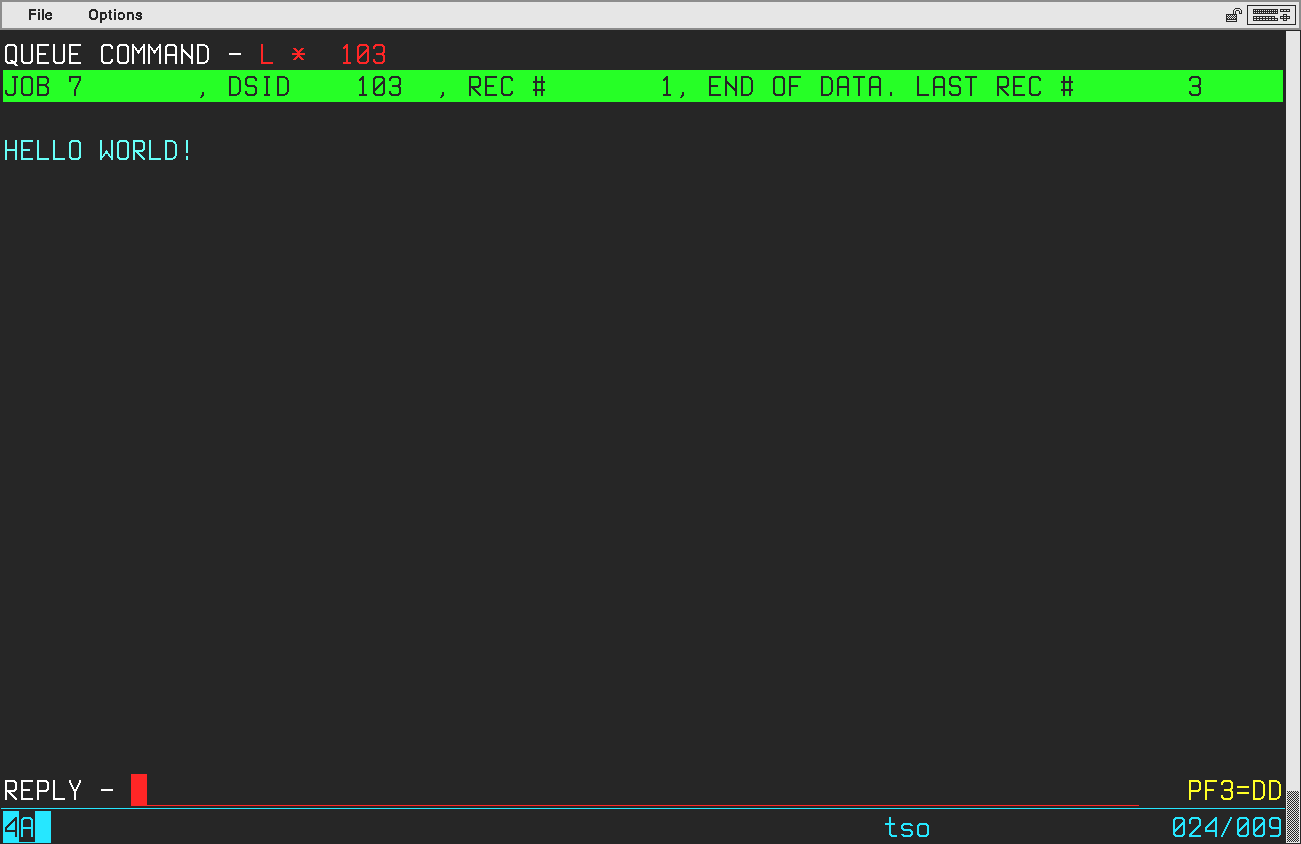
There should be 3 lines of output in the GO step SYSOUT. Type s in front of the GO step SYSOUT and press Enter:
You should see the following output from your COBOL program's execution:
The other output datasets (listed as COB SYSPRINT and LKED SYSPRINT) are the COBOL compiler output and LINK EDITOR output, respectively.
Note: In the Job Log and Allocation report you may expect to see three IEC130I messages, two stating that the SYSPUNCH DD statement is missing and one stating that the SYSLIB DD statement is missing. These are informational messages and do not impact the performance of the COBOL compiler or the completion code for the compile step. A SYSPUNCH DD statement is only required when a compiler option is specified that would result in the creation of an object deck. A SYSLIB DD statement is only required when the COBOL library functions are utilized (the COPY statement is used to include COBOL statements from a library into the COBOL program source).
When you are finished examining the output from your job, you can purge the output of your job and press Program Function Key 3 until you are back to the TSO READY prompt.
Update May 19, 2024: Over the past several years, I have had several questions about when, or if, I would be including instructions to build an MVS system residing on 3390 DASD. Last year, Rob Prins reworked Jim Morrison's 3375/3380/3390 DASD modifications, and his major updates to those modifications have now made it possible to build an MVS system residing mostly on 3390 DASD. The Turnkey 5 system that Rob administers and supports is just such a system.
As the Starter System does not have the capability to write to DASD later than 3350 - remember the 3350 was the most modern DASD available when MVS 3.8j was released - building an MVS system on 3390 DASD first requires building a system on 3350 DASD. So, it is at this point that we can use the system we just completed to build another MVS target system on 3390 DASD. It would be possible to drop back a few steps, build the distribution libraries, and then perform the system generation with 3390 DASD as the target devices. But, it is easier to simply copy the system datasets we have constructed over onto 3390 DASD. That is the approach I have taken, and I have documented the steps to accomplish that. It is a short process, three jobstreams, that should take less than fifteen minutes to complete.
If you have no interest in having your system datasets on 3390 DASD, you can simply skip to the next section below: Shutting Down TSO and VTAM. If you want to migrate over to 3390 DASD, or at least investigate the possibility, follow on to: Migrate System Datasets to 3390 DASD. At the end of those instructions, I will provide a link to return right back here.
So that you will know how to shut down TSO and VTAM in an orderly manner, here are the steps. [If you are returning from Migrate System Datasets to 3390 DASD ... sorry for a little repeating.]
First, if an application is running, such as RPF or QUEUE, you must end those to return to the TSO READY prompt. For most TSO applications, PFKey 3 is the key used to exit a panel and return to the previous one. So pressing PFKey 3 repeatedly should eventually terminate any application and return you to the TSO READY prompt.
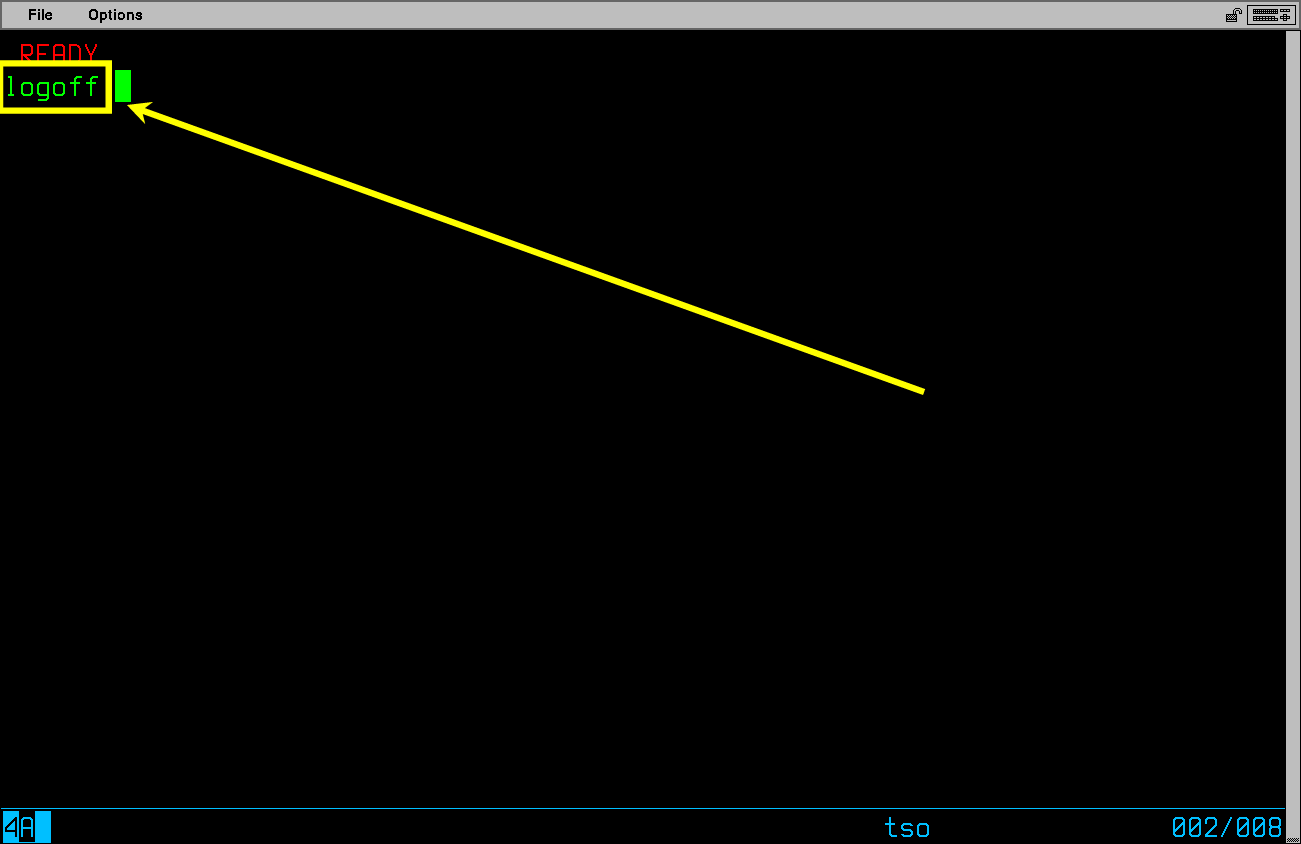
First you should log off all TSO sessions you have running with the TSO LOGOFF command:
When you log off of TSO the tn3270 client window will again display the Network Solicitor screen.
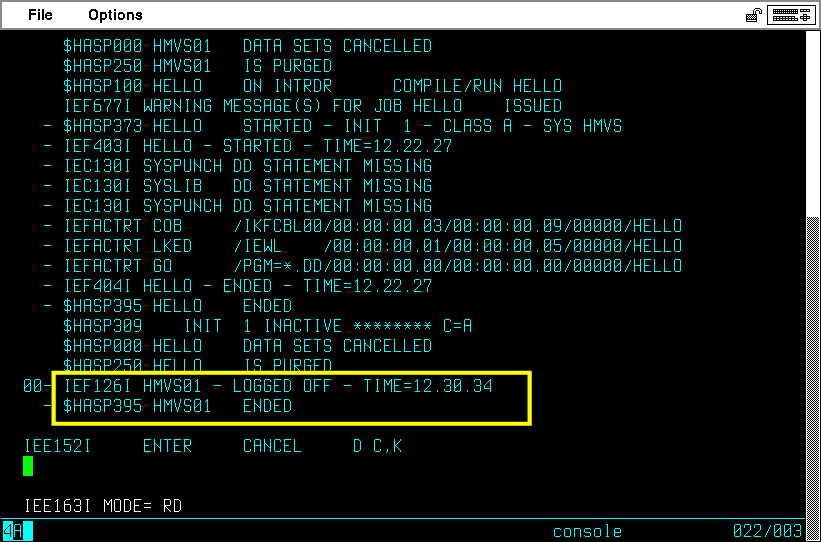
The MVS console will issue messages indicating your TSO User ID has logged off:
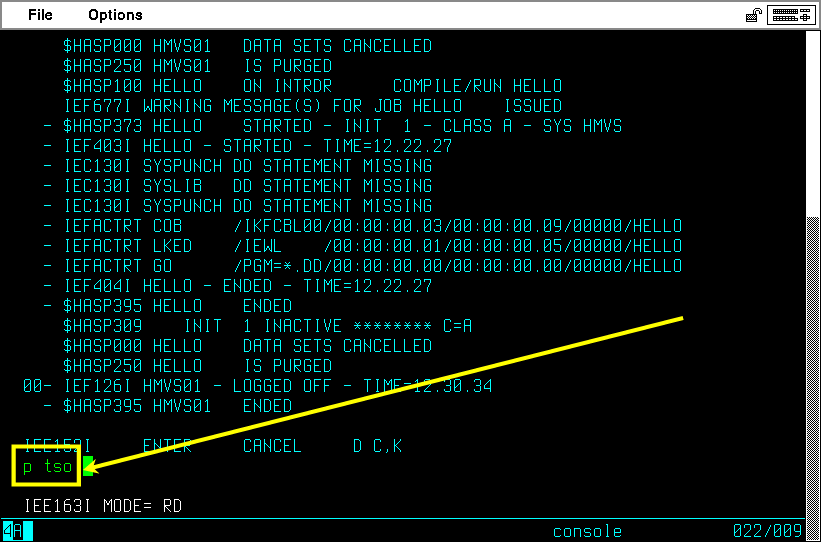
To shut down TSO, on the MVS console, type P TSO and press Enter:
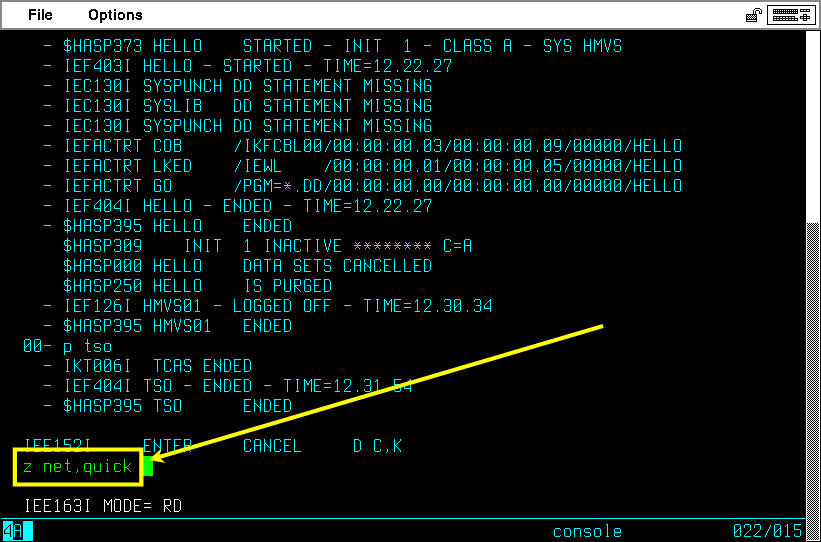
If you have properly logged off all TSO user sessions, the shutdown will be quick and without fuss.
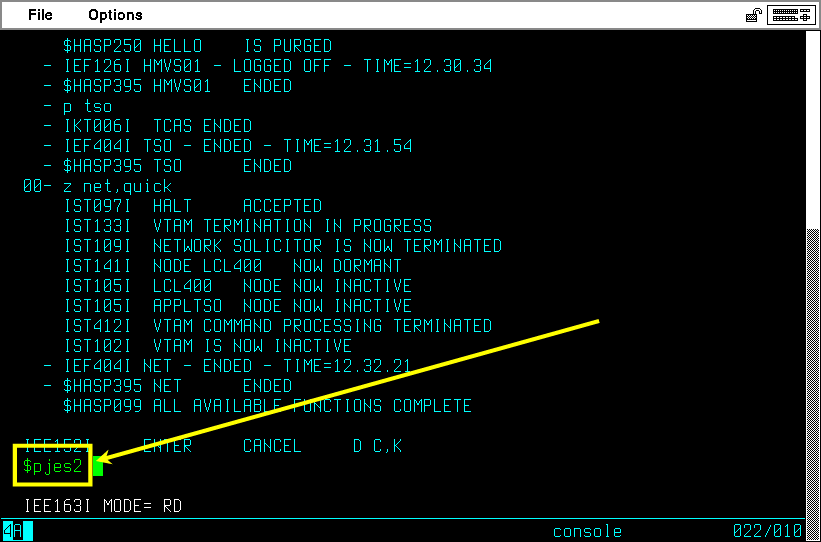
TSO will terminate. Then to shut down VTAM type Z NET,QUICK and press Enter:
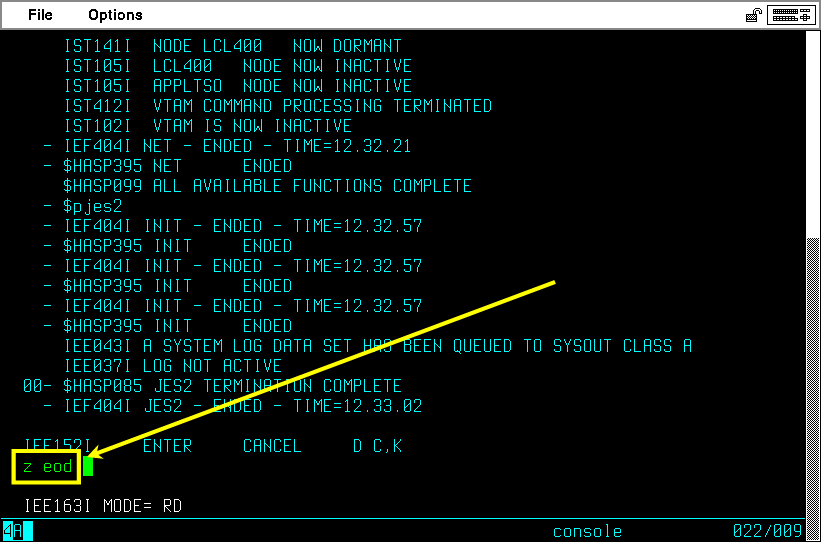
VTAM will terminate. Then, to shut down JES2 type $P JES2 and press Enter:
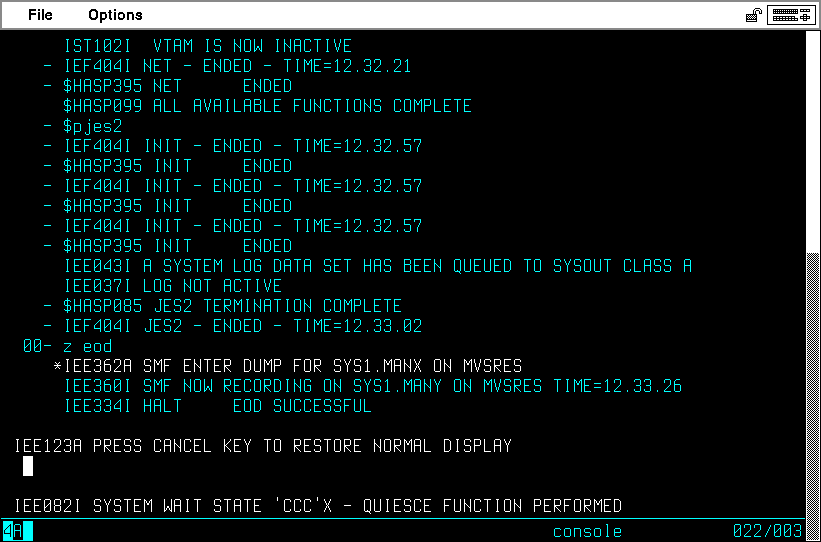
JES2 may take a few seconds to terminate, as it waits for processes it manages to complete. Then to shut down MVS type Z EOD and press Enter:
The 'end of day' processing includes writing final records to the System Management Facility dataset. A switch to the alternate SMF dataset will occur, even though MVS will not write anything to the dataset.
To make certain that MVS writes any data it is holding in memory to datasets, type the command QUIESCE and press Enter:
After quiesce, the system will go into a wait state:
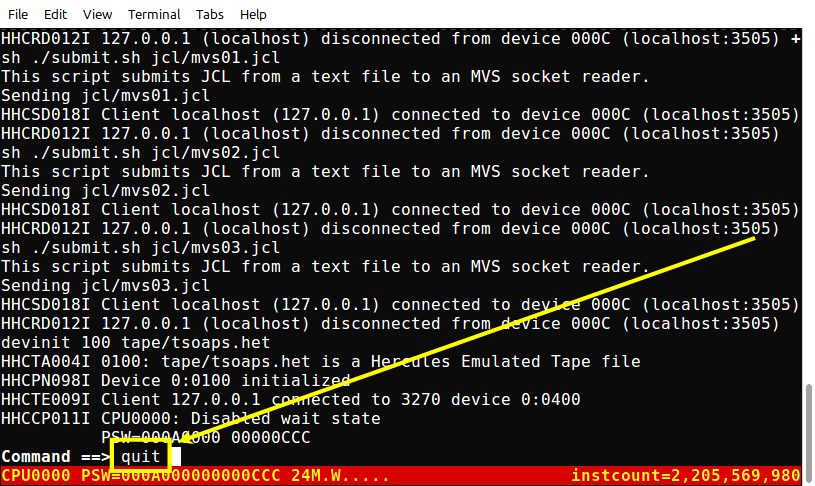
On the Hercules console, enter the command 'quit':
In this step you have made many changes to your new MVS 3.8j system. It would probably be a good idea to make a backup copy of the files in the dasd directory. If you later damage your system datasets, you can recover to this point by restoring the backup and restarting MVS. You can use any means to store a backup copy of the files - place them in a WinRar, Zip or tar archive; or burn them onto a CD-rom blank.
If you have not already done so, you need to edit the Hercules configuration file (mvs.cnf in the conf directory) and remove the hash (#) in front of each of the addresses for these new volumes (180 and 190); they were already entered into the configuration file, but could not be made active until the volumes were initialized. If you do not do this, the next time you IPL the MVS system, some applications will probably not start!
After that, it is up to you. I am always seeking ways to make improvements to my Hercules/MVS system; changing something here, installing a program there. After all, if I make a drastic mistake and irreparably damage my MVS installation, it is only myself that is affected; at the very least I have learned something valuable in the event. I am amazed at the number of user developed TSO commands and batch programs that are available to simplify one task or another. Would that I had access to these at some of the vexing moments in the past when I was trying to overcome a seemingly insurmountable obstacle that I now find is almost a non-existent problem when I apply one of the commands or jobstreams I have installed. If you are just starting out with MVS, I have written a short page summarizing some things I have learned about maintaining MVS. It may be viewed at Customizing MVS.
As we have already installed the SYSCPK DASD volume, you have all the compilers available and ready to use, but you might need to look at the Assembling/Compiling page to find answers to questions you have about how to use them.
If you are interested in creating and using VSAM datasets, I have written a tutorial on using VSAM (VSAM Tutorial). And you might check out the VSAM interface routine (VSAM I/O routine) that will allow you to write COBOL and PL/1 programs that access VSAM datasets. VSAM support was not present in the MVT COBOL and PL/1 compilers, so you will need to use the VSAM I/O routine to access VSAM objects from programs written in these languages and compiled with the old MVT compilers.
I have also written a tutorial on TSO (TSO Tutorial) that covers all the basic TSO commands as well as extensive coverage of what you need to know to write Command Lists.
Ralf Jonas caught and reported several typographical errors in these instructions. He also suggested I create a page documenting the steps to IPL the completed MVS system, so I have added that as an additional step - Normal Startup of Customized MVS 3.8.
I hope that you have found my instructions useful. If you have questions that I can answer to help expand upon my explanations and examples shown here, please don't hesitate to send them to me:

This page was last updated on April 07, 2025.